27
This is a collaborative post. All opinions are my own.
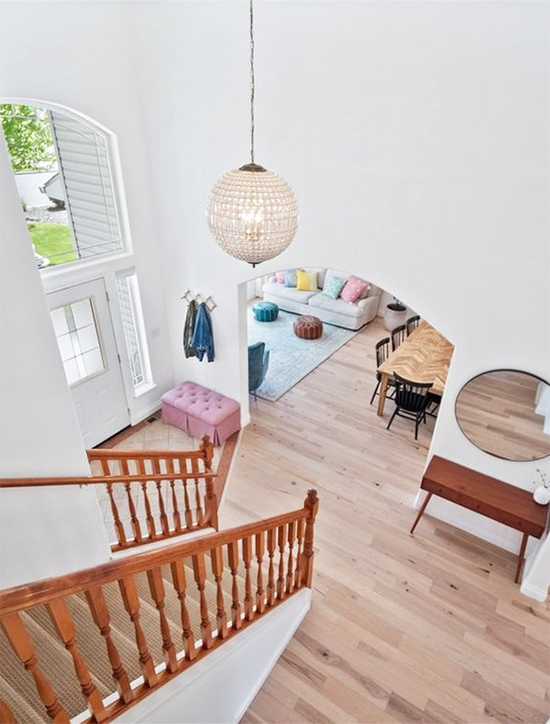
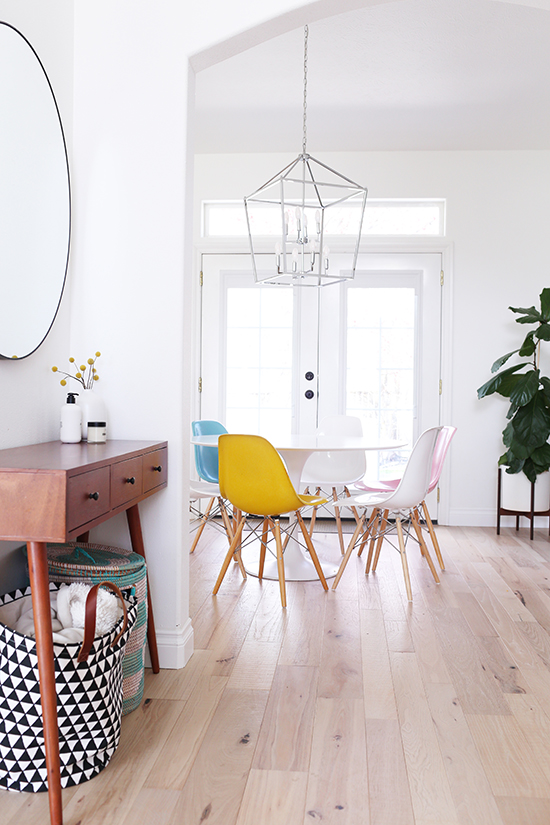
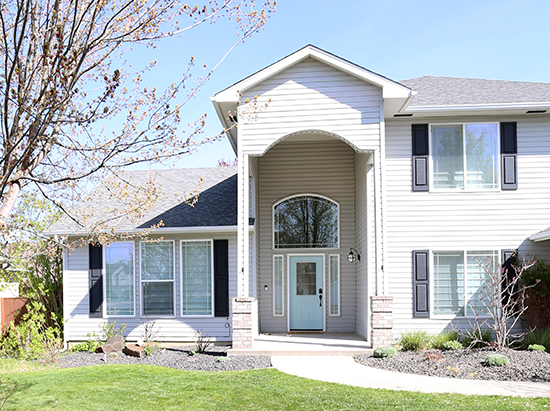
One of my favorite things about our house is how bright it is. Natural light just pours in from all the windows, especially now that we removed the kitchen wall to make it more open concept. I've noticed that most of the interior photos I am drawn to are also really bright--in magazines and blogs, on Instagram or Pinterest. Some of it could be the photo editing, but still...I think brightness truly makes a home feel more beautiful, cheerful, and glowy. But what about if your home isn't so bright? What can you do?

Add Windows
Adding or enlarging windows will undoubtedly make your home brighter. Nothing beats natural light streaming through your home to illuminate every square inch. For a dark and windowless room, adding windows (or skylights) will be the most effective way to brighten everything up. If you have a solid front door, an easy and practical way to get more light is to add a window insert into your front door or get a new door with a window.
Get Sheer Curtains
If you already have a lot of windows, or you don't want the hassle and expense of adding more, sheer curtains might be a smart move. Thin and billowy sheer curtains allow you to have the maximum amount of sunlight coming through, while still affording you some privacy. Dark curtains will immediately absorb the light, causing your home to be much darker. Sheer curtains can be a really inexpensive option that can make a big difference in the light level in your home.
Paint the Walls
The first thing we did when we bought our house was paint all the walls white. Paint is probably the single most affordable and impactful way to brighten your house immediately. White walls reflect light, making the room look brighter and larger. If you think white is boring, light colored walls can also feel very bright and cheerful...or you can layer in color with accessories like pillows.
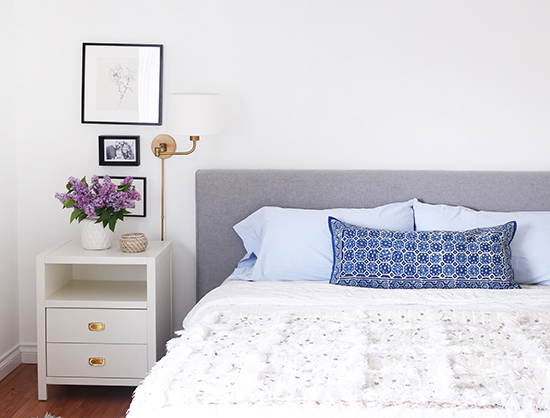
Make Over Your Bed
You probably spend more time in bed than in any other location in your house, so it's worth making sure your bed is a bright and happy place to start each morning in. To start, look for a mattress made with non-toxic materials to give your sleeping space the most sustainable and luxuriously comfortable base. Next, think about getting a white comforter. White is the best color to brighten a room easily, plus it goes with everything. Now, if you want a pop of color to liven up your bedroom, pillows are the best way to personalize your bed.
Buy Light Colored Furniture
If you want your home to feel bright and welcoming, try and avoid using heavy, dark colored furniture. Think white bookcases, cream sofas, and light wood tables. If you have dark floors, adding a lighter colored rug on top can really brighten things up. In the kitchen, consider painting your cabinets white or installing lighter counters like marble or quartz instead of a dark granite.
Add Mirrors and Extra Lighting
Mirrors and lighting are essential to any home. Mirrors open up a room and reflect any natural light that enters the room. Light fixtures can illuminate dark corners that don't get natural light, and generally make your home brighter and more stylish. These two elements can be very powerful in making a depressing room feel much lighter and happier.
Clean
Take some time to vacuum up the dust bunnies, wipe down the baseboards, and scrub down your windows. This is a task we all dread, but the results are worth it. The thin layer of dirt you get rid of will make for a clean house which goes hand in hand with a brighter home.
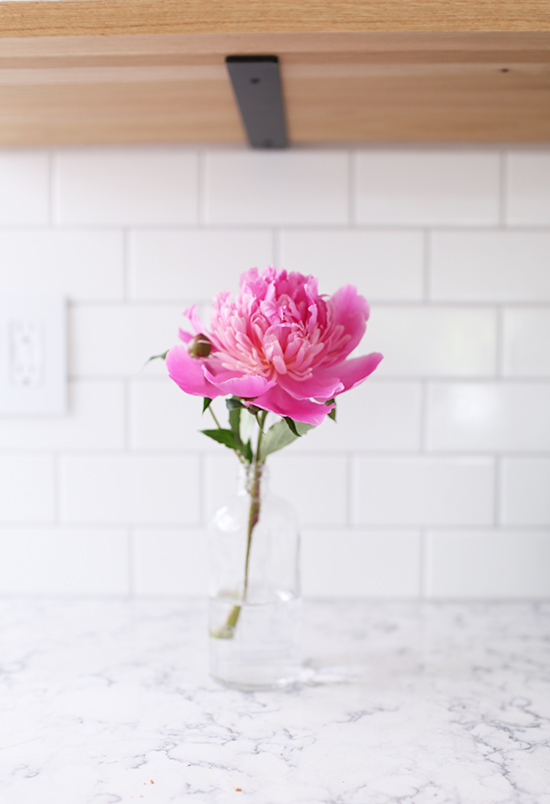
Bring in Plants and Flowers
Bringing the outdoors inside is an excellent way to make your home brighter and happier. Houseplants or fresh flowers in a vase both improve the air quality in your home and add color. Plants create a relaxing atmosphere and are a welcoming sight, no matter how hard your day was.
Brightening up your house can be a small or big project, depending on how much time and money you are willing to spend. If you have been considering this for a while, updating countertops or painting walls will make a significant difference. If you are just looking for some simple updates, go to your backyard and clip some flowers to bring in, or take the day to deep clean. No matter what you do, a brighter home will result in a brighter life!

26
I just found this post in my drafts! It has a lot of good info from when I was doing research for our flooring, and I'm hoping it can be helpful to some of you. Our floors are actually the thing that I get the most DMs about, so I know a lot of you have flooring questions...and I totally understand why. Unlike painting a wall, which is relatively inexpensive and easy to switch if you change your mind, flooring is expensive and replacing it is a major endeavor. It's a big disruption to your everyday life (we literally moved every piece of furniture and appliance from our main level into the garage) so it's definitely something you want to get right the first time. We ended up choosing this hickory engineered hardwood from Home Depot (you can read all about it here if you'd like). It's held up very well despite two toddler boys that are rough with it and spill food and drinks daily, and I think it was the right choice for this house! But the right answer might be different for you. Here are the pros and cons of different types of wood look floors, from all the research I did. Hope it's helpful to you!
Solid Hardwood
This is the real deal, and it's prized for a reason. 100% genuine hardwood, each plank is crafted from one solid piece of timber so it can be sanded down and refinished multiple times. This ability gives it great longevity (it's how 100-year-old houses can still be rocking their original hardwood floors). It typically comes in 3/4" thickness and locks together with a "tongue and groove" system. It comes in dozens of different wood species and can be stained any shade, light to dark. Solid hardwood is beautiful and timeless, and obviously the most authentic of any wood look product. But it does have some drawbacks. It's always nailed down or stapled (never floated) so it cannot be installed over concrete subfloors. It's generally more expensive and more difficult to install. It's also susceptible to water damage so it's not recommended for bathrooms, mud rooms, and other areas that get a lot of moisture.
Engineered Hardwood
Engineered hardwood has a thin veneer of real wood on top, backed by layers of plywood or fiberboard. This makes it both less expensive than solid hardwood, and less susceptible to moisture. It typically comes in either 3/8" or 1/2" thickness, and can be nailed, glued or "floated" (making it acceptable for rooms with concrete subfloors). It's easier to install than solid hardwood, especially if you get one that clicks together as a floating floor. And because it's more water-resistant, it's a better choice for kitchens and areas that get moisture. Because the top layer IS real hardwood, it looks more genuine than other hardwood alternatives. You can choose from just about any wood species for a wide variety of looks. One of the most popular choices is engineered dark grey flooring, which looks perfect in any room. But a big drawback is that engineered wood cannot be sanded down and refinished as much as solid hardwood, since the top layer is so thin (most types will only allow a couple refinishings, and some none at all).
Bamboo
Bamboo flooring is a renewable and affordable wood alternative that's made of bamboo strands that are sliced and shredded, woven together, then pressed into boards with heat and glue. Bamboo (technically a grass) is actually more durable than most species of wood, plus it's easy to clean and generally costs less. Some bamboo floors can be refinished, but not as many times as solid hardwood. Bamboo flooring looks similar to wood from a distance, but up close you'll typically see thin stripes with distinctive "knuckles" across the boards (like on a stalk of bamboo). As for moisture resistance, it's similar to solid hardwood. If you prefer darker wood, one negative is that bamboo is naturally light in color. It can be "carbonized" for a darker appearance, but I learned that this process softens it and makes it more prone to scratches.
Luxury Vinyl Planks
If you love the look of wood but don't want to worry about spills and moisture, luxury vinyl planks are a smart and practical choice. The surface layer is printed and embossed to mimic the look and feel of real wood--but they're actually made of all synthetic materials. A huge pro is that vinyl flooring is 100% waterproof, for an extremely kid-and-pet-friendly option. As such, luxury vinyl planks can work in any room in the house, including kitchens, bathrooms, and basements. The individual planks lock together for a DIY-friendly floating installation. Their price is also highly appealing, even less than engineered wood. But there are cons too. The printed patterns will repeat over and over, which looks more artificial than the natural variation of real wood. And your subfloor will need to be perfectly smooth before installation, as vinyl will show bumps and unevenness more than more rigid options.
Laminate
Laminate is what our house had before. It's water resistant, scratch resistant, easy to clean, and budget-friendly. The core is made of fiberboard, with a photographic layer on top that mimics the look of real wood. It's pretty realistic looking, although again the repeating "wood" patterns can be a giveaway that it's not the real deal. Another negative of laminate is that it can't be repaired. If your floors get dinged and chipped by objects dropping on them (as ours did), you can't sand and restain them like you could with hardwood. On the plus side, it's easier to install than hardwood floors and the cost of installation is cheaper.
Wood Look Tile
One last alternative to wood floors: wood look tile. Virtually scratch-proof and waterproof, these can be an appealing low-maintenance option. They can look remarkably like wood, will last a very long time, and can be installed anywhere including over concrete subfloors. But wood look tile has some big cons too. Tile is more slippery than wood, it's harder and not as comfortable underfoot, it feels colder, and things are more likely to break if you drop them on tile. Installation is also expensive and labor-intensive, especially for a large amount of square footage. And of course, tile can't be refinished if you change your mind and want a different color down the road.
What kind of floors do you have? What do you prefer? Do you have any other questions about flooring??
22
This is a collaborative post. All opinions are my own.
If there's anything the Covid 19 crisis has showed us, it's how quickly things can change...and how important it is to have some savings to weather the storm. I don't think anyone saw this coming: a worldwide pandemic that would shut down small businesses, leave millions suddenly unemployed, and cause entire industries to come screeching to a halt?! It was so swift and unexpected, it caught many of us unprepared. So what next? We can hope for the country to reopen soon, but that's uncertain and out of our control. In the meantime, one thing we can do is ramp up our personal savings and prepare for a bumpy ride. Here are some ideas to save those pennies while in quarantine.

1. Reallocate common spending categories to savings - Right now is a unique time. Our spending has been completely slashed in common categories like on gas, entertainment, dining out, and travel. This is a chance to take the money that would have normally been allocated for those buckets, and dump it straight into savings. Who knows, during this time you might find alternatives you like just as well (like recipes you can cook at home). If you can change some of those expensive habits for good, it will help you keep costs down even as restrictions get lifted!
2. Take the 30 day challenge - It can be tempting to do more online shopping right now than usual. To curb those impulses, instead of buying an item right away, put that money aside for 30 days in your savings account. If you still want it after the 30 day period is up, go for it. Otherwise, the money stays in your savings account. This will help you avoid a lot of frivolous purchases that you'll later regret. Once the money's already in your savings, it's more likely to stay there.
3. Cancel unnecessary subscriptions - Monthly subscription services have become sooo common, for everything from razors to clothing to meals. You might even have digital subscriptions you've totally forgotten about like Hulu, Audible, Photoshop, news websites, apps, and so on. Then there are memberships to places like the gym. Some of those services might have made sense before lockdown, but your habits may have changed now that you're home all the time (do you need a new box of clothes or makeup every month when you're hardly leaving the house?). Go through your credit card statement with a fine tooth comb and ditch those subscriptions!
4. Reduce household bills - Speaking of recurring expenses...this is a great time to look into things like home insurance, car insurance, internet, phone, and other household bills. While you're home during the day, shop around and see if you can find a better deal, or call your provider and see if you can negotiate a lower rate. A little bit of time can help your budget a lot.
5. Online trading - My take on investing is that it's for the long-term. Historically, over a long period of time, the stock market has always risen...so the safest and most surefire way to invest is to put your money in an index fund and leave it there for a long time. But if you're interested in trading, look for online trading sites with the lowest trading fees. If done well, this can be a way to supercharge your savings, quickly.
If you are determined to save money, then you will do it. You'll figure out many other ways to reduce your expenses and pump up your savings as quickly as possible. You just have to find your "why." Ben and I are motivated by our kids...making sure we have enough in the bank to keep our family safe and healthy, is far more important than any discretionary spending or creature comforts we enjoy.
21
This post is written in partnership with Bali Blinds. All opinions are my own.
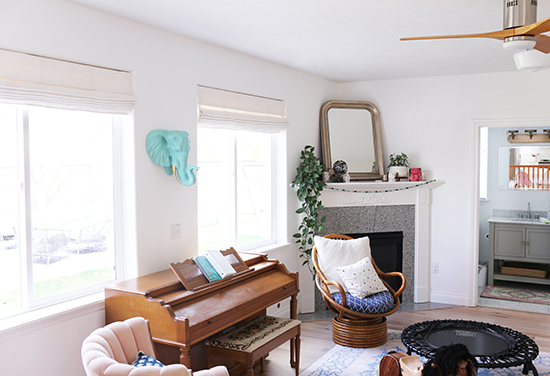
Open concept homes--where the kitchen, dining room, and living room flow together in one big space--have been extremely popular in the past decade. Watch any HGTV show, and you'll probably see a wall or two get taken down. The dramatic before & afters aren't the only reason why this layout is so desirable. With open concept designs, natural light can pass freely through the house, making it brighter. The lack of walls makes the space feel bigger. It's easier to keep an eye on young kids. And when you're entertaining, you can prepare food in the kitchen without missing out on the conversation in the living room. But there are cons too. When one room is messy, it can be seen from all the other rooms. There's less privacy and separation of activities. Your house can feel less cozy and intimate. And open concept designs make decorating a challenge. With sight lines into so many other rooms, you have to be conscious of how everything flows together, and coordinate your design choices accordingly. So what does that mean when it comes to window treatment design? In an open concept home, should all your window treatments match? As someone who lives in open concept home, today I thought I'd share what we've done in our house, along with my best tips for making your window treatments feel cohesive.
1. Know when to match. There is one instance when you absolutely should match your window treatments: when you're dressing windows that are next to each other on the same wall. If you need window treatments for multiple windows like this, it would be weird not to match. The rest of the time? It's up to you. If you prefer the simplicity and consistency of getting the same window treatments throughout the house, you can certainly do that. But for a more interesting, custom look, mixing is actually preferable. Think about it like remodeling two bathrooms at once. You could get the exact same vanities, tile, and so forth for for both rooms. It'll be quicker and easier...but it'll also look more generic and kind of boring. For a more designer look, you would customize each bathroom with different elements that complement each other.
2. Learn how to mix. If you decide to mix and match window treatments, the key is to make sure they coordinate with each other. You don't want them to be matchy-matchy, but they should have a common theme that ties them all together. This takes more time and thought than doing the same thing across the board, but the end result will be worth it. Not only will it look more designer-approved, but mixing allows you to intentionally choose window treatments that are tailored to each room's practical needs.
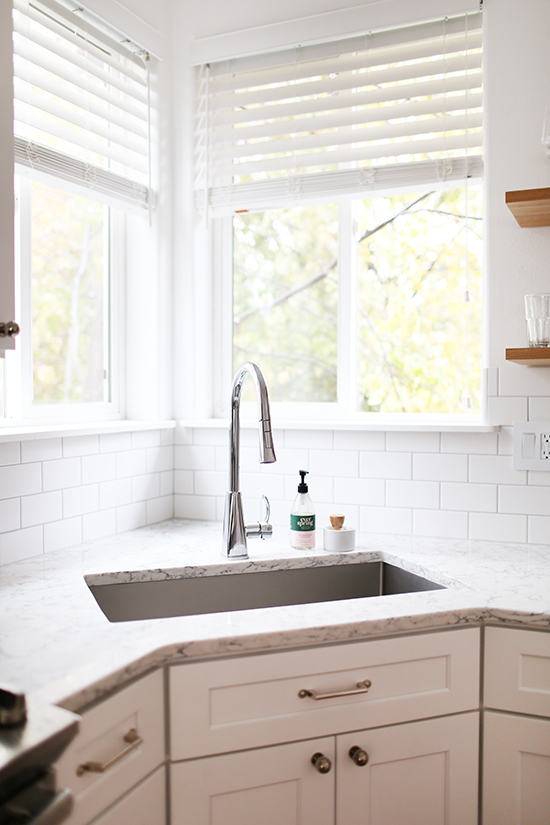
3. Start with the practical considerations. Function is essential for good design, so the first order of business is considering which window treatments will work for you practically. Every room has different needs, which is why it's not ideal to copy-paste the same window treatment throughout the entire house. You might need moisture resistance in the kitchen, more formal window treatments in the living room, and more privacy in the bedroom. Some windows are big, others are small, some are unusual shapes, and so on. All of these factors can quickly narrow down your options for window treatments that will work.
4. Avoid one-offs. Just like with any design element, repetition is key to making sure that nothing looks random and out of place. In our house, we did cellular shades for our small windows, Roman shades for our big windows, and wide-slat blinds in the rooms where we needed moisture-resistance. We also have drapes layered over the shades in our living room and master bedroom. Even though we have several different styles of window treatments, each one is used at least twice so it feels intentional.
5. Stick to a color palette. A definitive color palette will give your house a good visual "flow," which is absolutely essential in an open concept home. I like light neutrals in open concept designs (think white, beige, wood tones, and grey). If that seems too boring, feel free to add something brighter to your color palette. But don't forget that you can always bring color into your home with smaller items like pillows, art, and accessories! As seasons and trends change, it'll be a whole lot easier (and cheaper) to switch out a pillow cover than a window shade.
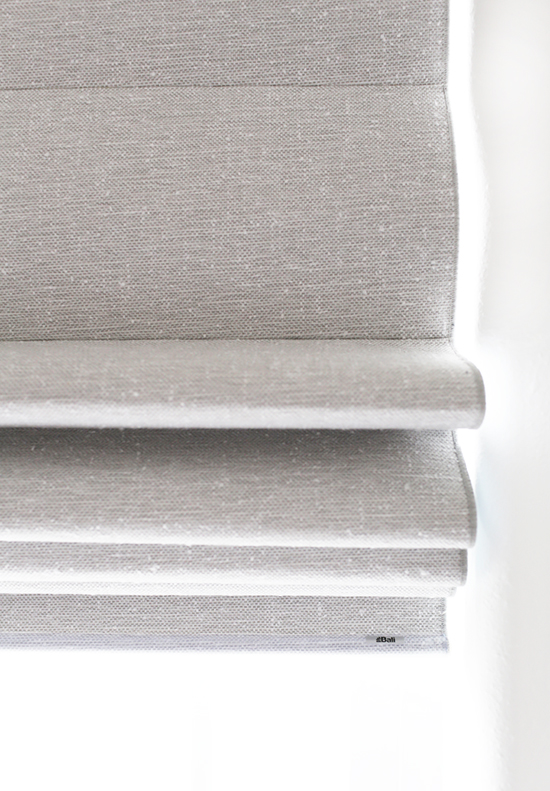
6. Keep the fabric texture similar. Perhaps the easiest way to create a common theme across different types of window treatments is to use the same fabric. For example, if you want to coordinate window treatments for your windows and sliding glass (patio) doors, Bali offers sliding panels that match roller, solar, and Roman shades, as well as VertiCell to match their cellular shades. But even if you don't use the exact same fabric, you can coordinate mix and match window treatments by keeping the fabric texture similar across the board. We used the same fabric for the drapes in our living room and the Roman shades in our family room, which helps to tie the two rooms together.
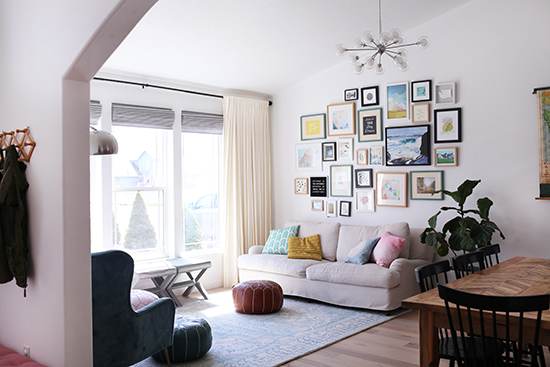
7. Add or subtract layers for variety that's still cohesive. A great way to coordinate mix and match window treatments is to do two layers. I especially love a Roman shade or natural shade with drapes on top. This combination looks so chic, but that's not all. It's practical too! The drapes block the light at the edges of the shades, plus double the layers means double the insulation and energy efficiency.
8. Closed off rooms can have more of their own style. With rooms like bathrooms and bedrooms that are closed off from the rest of the house, you don't have to be as concerned with the overall flow. You can let your kids have a say in the colors of their room, or you can try a fun pattern in the guest room or bathroom. These rooms are the perfect place to play with something a bit more trendy and bold.
9. Choose matching liners for curb appeal. Lastly, it's also important to consider how your windows look from the outside. Consistency is important, especially for your front windows. Most Bali shades are designed to have neutral liners, so you can make them match from the street, even if they're totally different inside. We have Classic Roman Shades on all our bigger windows in the front, so they all look the same when the shades are pulled. For the little sidelite windows on either side of the front door, we have cellular shades in white. While they aren't a matching style, the consistent color (white from the back) helps to tie it all together.
10. Make a mood board. Before you commit to any purchases, create a mood board. This can really help you envision whether all these different elements will work together or not. Pull together photos of the lighting, window treatments, paint colors, furniture, and so forth--and play around with swapping various options to see what you prefer. When designing an open concept home, I recommend creating a mood board of the space as a whole instead of trying to separate each zone. Digital mood boards are great, but it's also important to get fabric swatches that you can see in person. That way, you can make sure that your window treatments go together nicely with the furniture, window trim, and paint color. Bali allows you to order up to five free swatches to help you make just the right choice.
- Search
- Archives
