30
This post is sponsored by Zabitat. All opinions are my own.
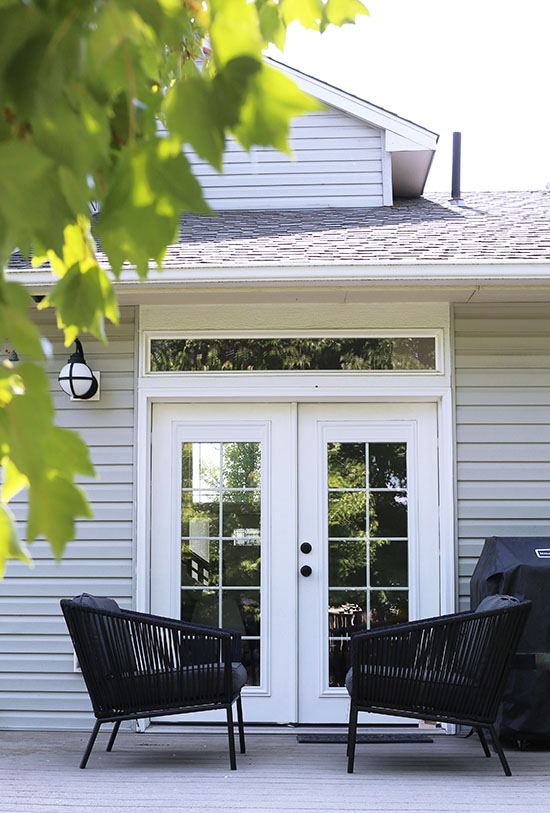
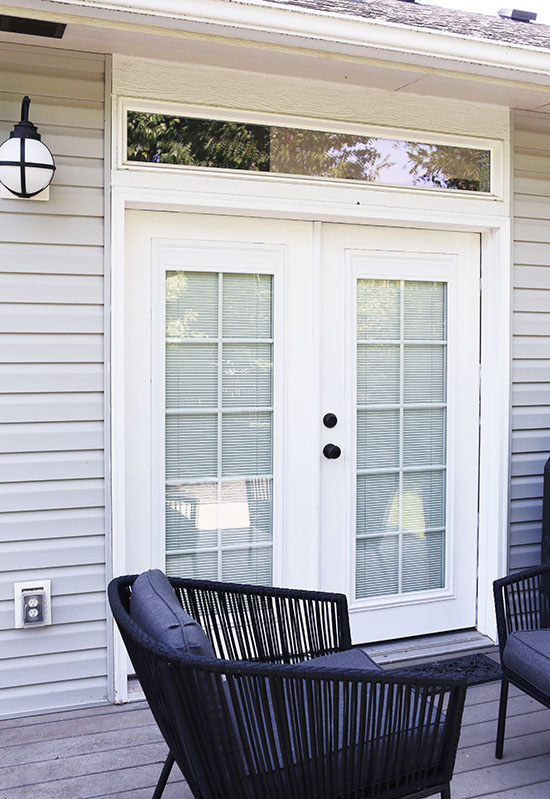
I just realized that several of my recent posts have included the word "budget" in the title. Can you tell we are trying to squeeze a LOT of home improvements out of a small budget? So I'm all about ways to get the most impact for the least amount of money. If you're thinking about replacing exterior doors, one awesome hack that you should definitely look into is Zabitat. They offer decorative glass inserts for steel or fiberglass doors, so instead of buying a brand new door, you can replace the glass on your existing door for a whole new look at a fraction of the cost. Our first idea was to upgrade the glass on our front door, to increase our home's curb appeal and let in more natural light. But as I was scrolling through Zabitat's site, I came across their door glass inserts with enclosed blinds, and I knew these would be PERFECT for our French doors in the back.
There was nothing technically wrong with our old French doors. They weren't damaged or anything. But with all that glass, we didn't have much privacy in the back of our house, and we felt kind of exposed at night. Also, French doors in the dining room + one messy toddler meant daily smudges on the glass, which was hard to keep up with. The Zabitat insert has an internal grille, so instead of cleaning the individual panes (and inevitably leaving a little dust and grime in the corners of each one), I can just wipe down the whole surface continuously. Sounds like a small thing, but when it's a everyday type of chore, it makes a big difference.
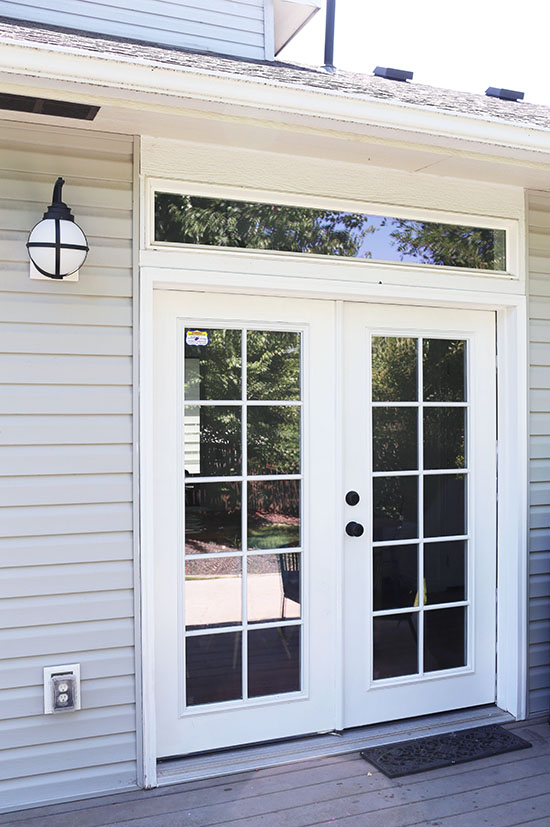
I was really intimidated by the idea of messing with our exterior doors, but I needn't have worried. This truly was an easy DIY project that anyone with a few basic tools can handle. There's an installation guide here, but it's pretty basic: you unscrew the raised molding around the old glass, pop it off, and push the old glass out. Then you place the new glass inside the door, add the raised molding on either side, screw it together nice and tight, and cover the screw holes with the included plugs. The whole process took less than half an hour!
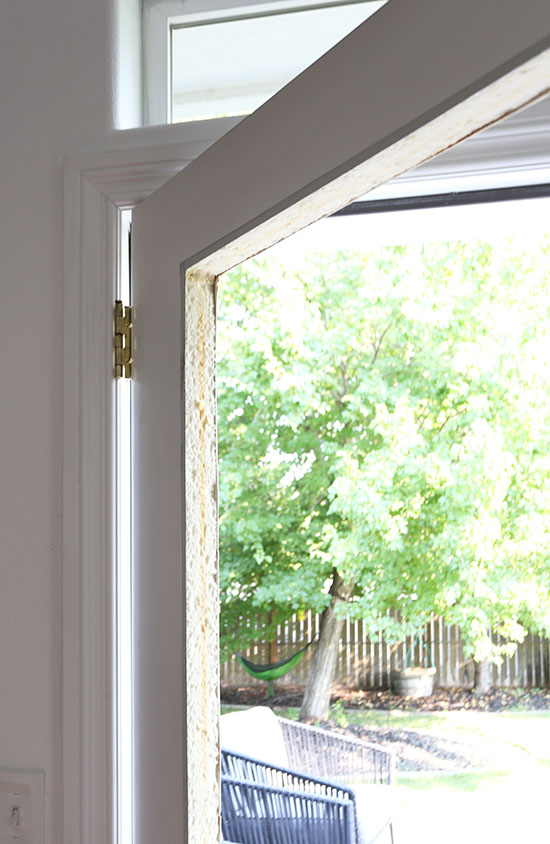
As you can see, our door is composed of two thin pieces of steel with insulation in between. When we were thinking about cutting a larger opening in our front door, I was too scared to try it. But seeing how thin the steel part is made me realize that we could probably handle it in the future--with the right tools. In this case, we just replaced the old glass with new glass that was the exact same size, and wa la!
The new doors are niiiice. I love the added privacy, light control, and flexibility that the blinds provide. And since they're fully enclosed within the glass, they won't get food smudges, dirt, or damage on them--EVER!!! There are also no cords to deal with, which is great for safety and ease of use (they're operated by the control you see on the right side--more visible below). When the blinds are fully raised, they disappear into the top valance so you don't even realize they're there. And when they're closed, the doors still have a very clean, modern look.

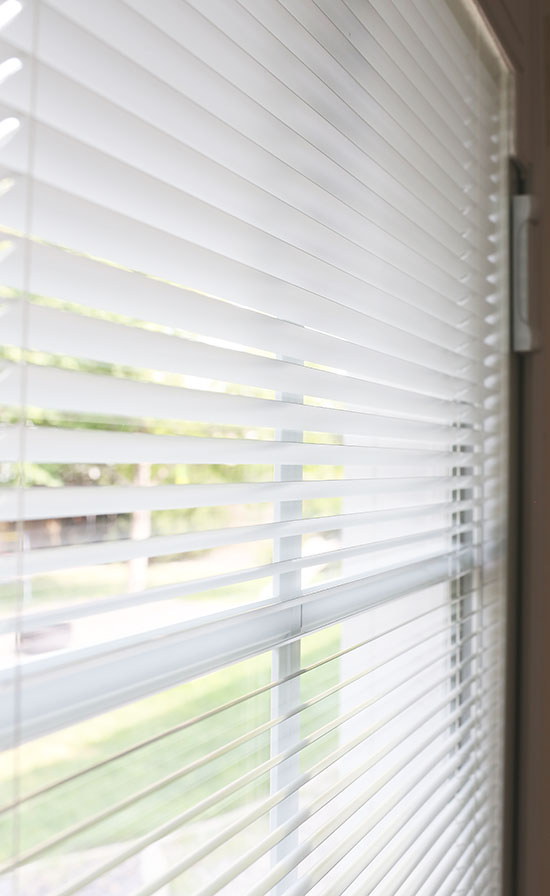
One more great thing about the Zabitat door glass blinds: they are energy-efficient. Triple pane Low-E glass means that they'll give you long-term value by reducing heat loss in the winter and solar heat gain in the summer.
Our overall experience with Zabitat was truly awesome. At first, I was skeptical of how DIY-friendly it would be to replace the glass in our exterior doors. I was afraid that we'd mess up and create a big gap or something. But the process really was simple, straightforward, and quick...I had no idea it was so easy to get "new" doors!
I still want to upgrade our front door too! That's a project that most people leave on the back burner until they're getting ready to sell. But I'd like to do it sooner than that, so we can enjoy the improved curb appeal while we're still living here. Working on curb appeal might seem vain (I admit, there's nothing "wrong" with my front door either--I just want it to look pretty!). But I also believe that it has a real psychological effect on how you feel about coming home. When you're admiring the view as you walk up to the front door, you'll be a tiny bit happier every single day. That's worth it to me! These front door transformations are getting me inspired.
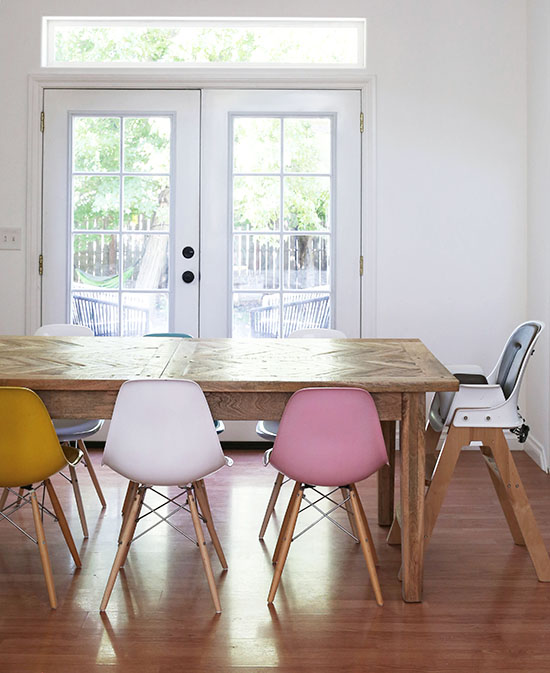
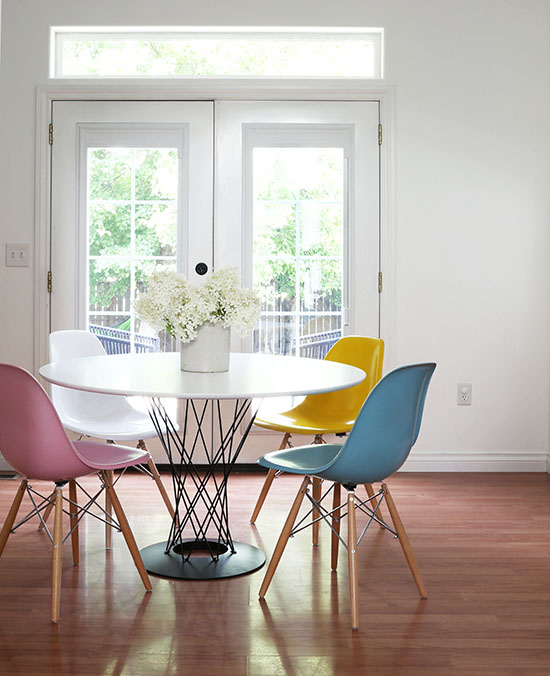
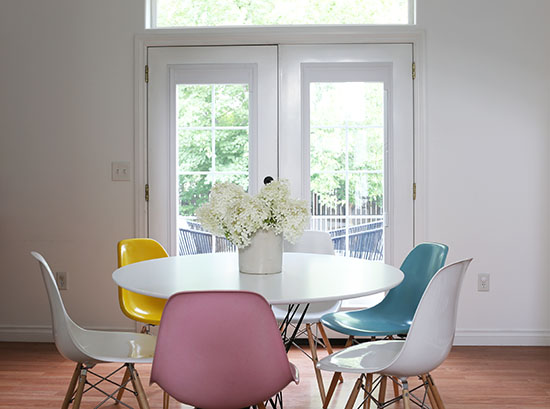
P.S. If you remember my post about round dining tables, the one in these photos is the table I ordered. The price was so tempting, I took a risk on it despite the lack of reviews. Wellll unfortunately the quality wasn't great, so we already returned it. But we DID love the way a round table felt in this space--so much more breathing room around the edges! Now we're just trying to decide which table to order next. If you have a round table you love, I'm open to suggestions!

22
Huge thank you to The Home Depot for partnering with me on this post. All product choices and opinions are my own.
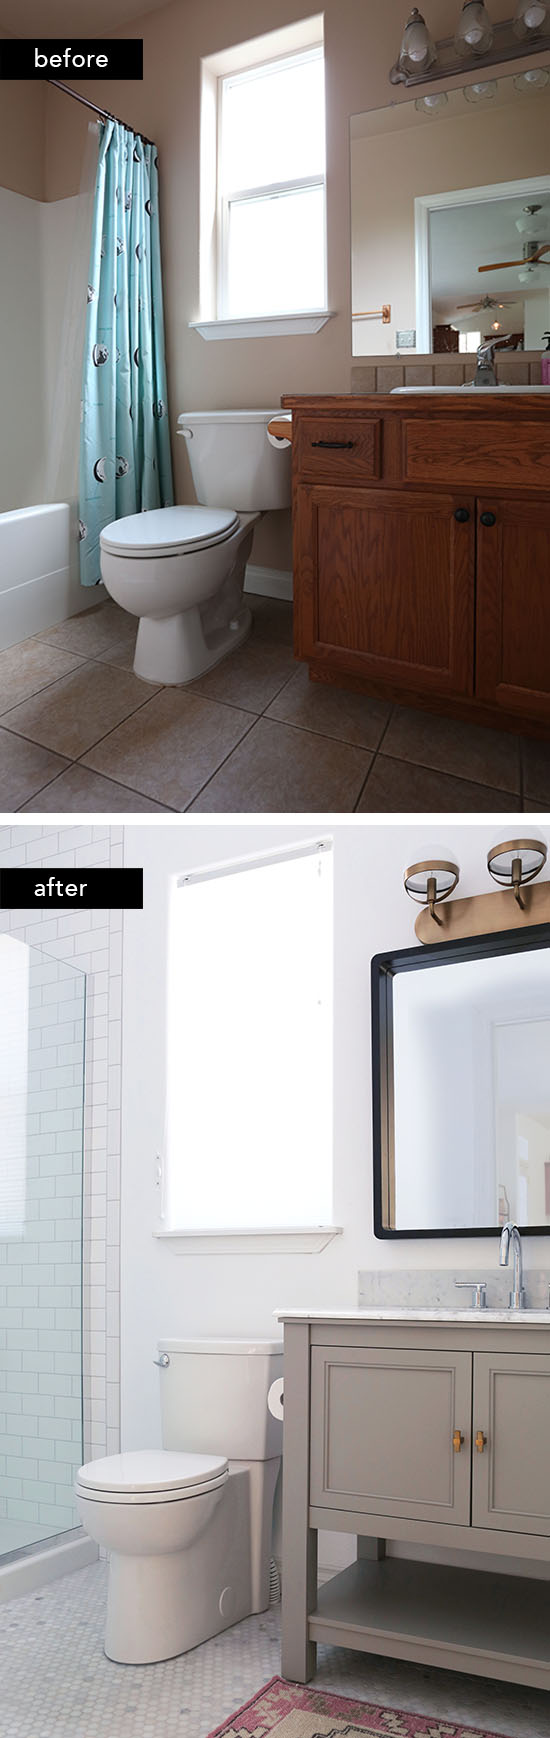
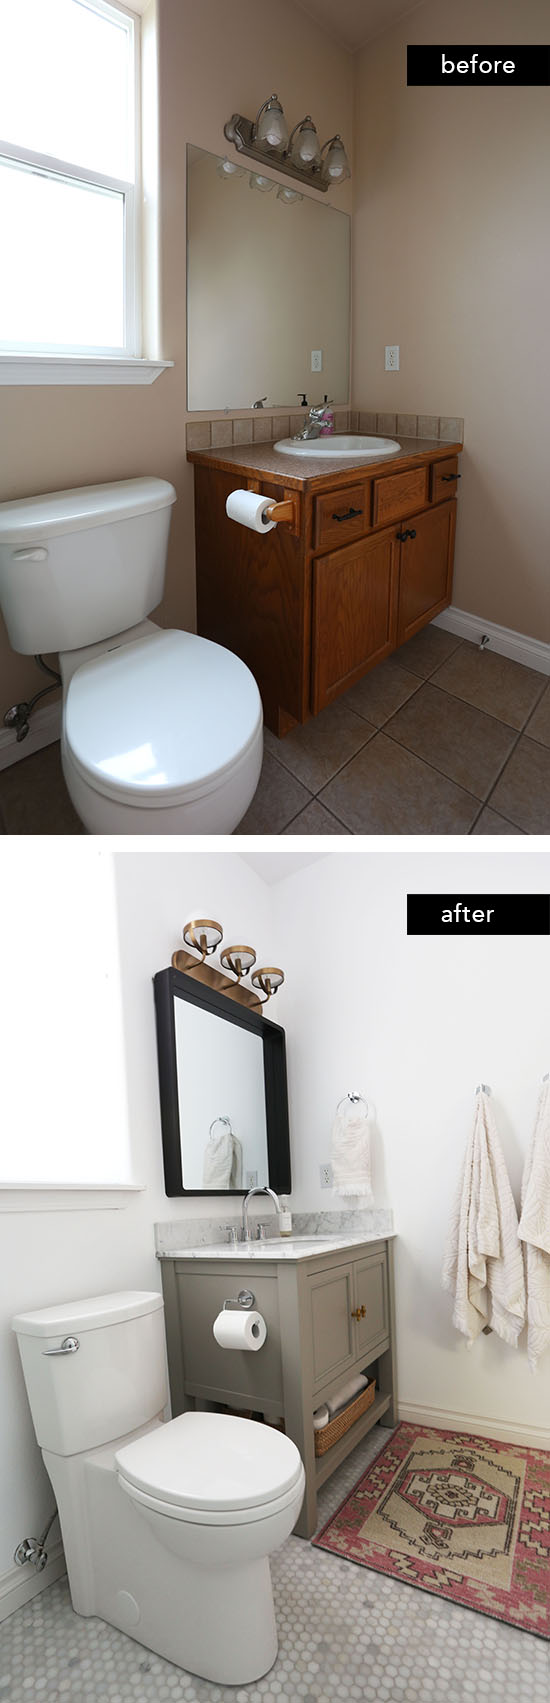
It's finally time to reveal our finished guest bathroom! I've got the before & after pictures, nitty gritty details, and all the sources below. We were lucky enough to partner with The Home Depot on this project. They were a dream to work with, and I'm thrilled with how this bathroom turned out. It went from boring builder beige to bright and beautiful! I'm honored to have our bathroom featured on their blog here.
We rented our previous homes, and neither of us grew up with parents who did much DIY home improvement, so we came into this project with very little remodeling experience (besides watching HGTV, which we all know is super realistic--ha!). We also had a pretty tight budget of $5,000. I love looking at high-end bathrooms for inspiration, but I think finding inexpensive alternatives is a fun challenge.
In order to make the most of our limited budget, we tried to make decisions with future resale in mind. I've heard a lot of people say, "it's YOUR home, do what makes YOU happy," and I agree with that sentiment whole-heartedly...but a bathroom remodel is also much more expensive and permanent than a painted wall or a patterned rug. Even my own tastes change over the years, so rather than being brave with trends that I love right now, I decided to choose pieces that are classic, neutral and timeless--and that I still LOVE. So yes, I'm hoping this bathroom will appeal to a wide range of buyers in the future..but even more importantly, I'm hoping that I will still love it in two, five, ten years--however long we stay here. A few years ago, we bought a bright blue bed and I loved it at first, then I got sick of the blue and wanted to switch things up. We moved that bed to our guest room and now we have a grey bed which suits me well...it's much easier to switch out accessories and art than it is to switch out the bed! I used that same philosophy with this room: neutrals for the big stuff that's hard to change, a little more personality with the accessories like the rug and lighting. Am I playing it safe or playing it smart? Maybe both, but either way I am super happy with the balance we struck in this bathroom! It's definitely "my style" but I'm also pretty confident that we improved our home's value by at least as much as we spent.
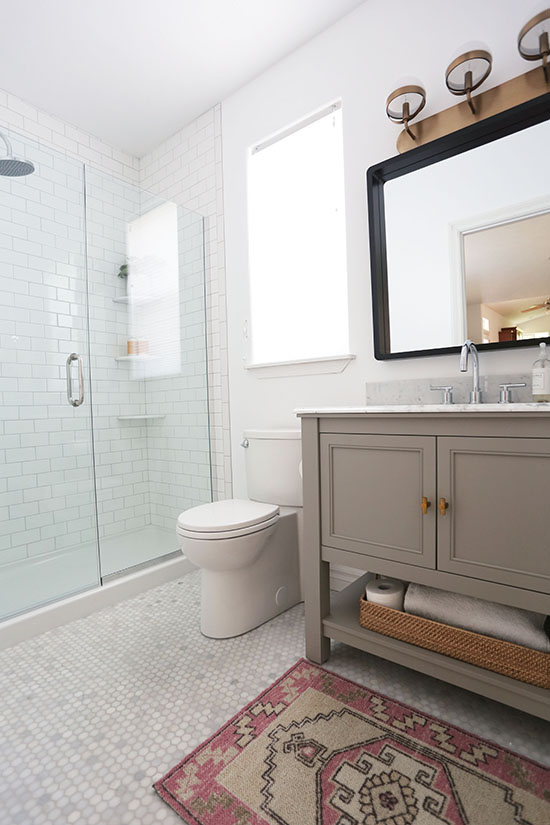
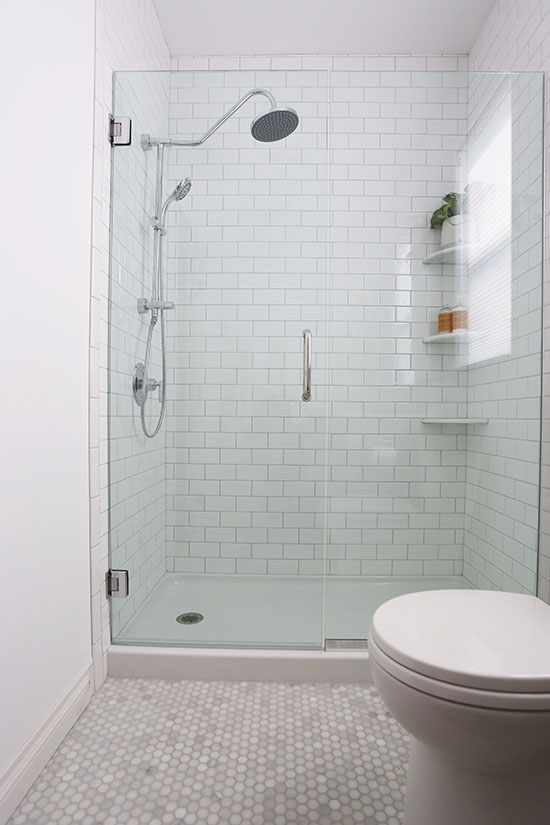
Speaking of resale though, one decision we weren't totally sure about beforehand was the shower. We went from a tub/shower combo with a plastic surround, to a tiled walk-in shower with glass doors. In this case, we did make the decision based on what we wanted. We both take showers at least 90% of the time, and we have two other bathtubs in this house for young kids and the occasional soak. I'm pretty sure taking out the third tub won't negatively impact our home's value...but if it does, oh well. We are REALLY enjoying the big beautiful shower, and are glad we went for it. In my opinion it's a huge improvement on what was there before.
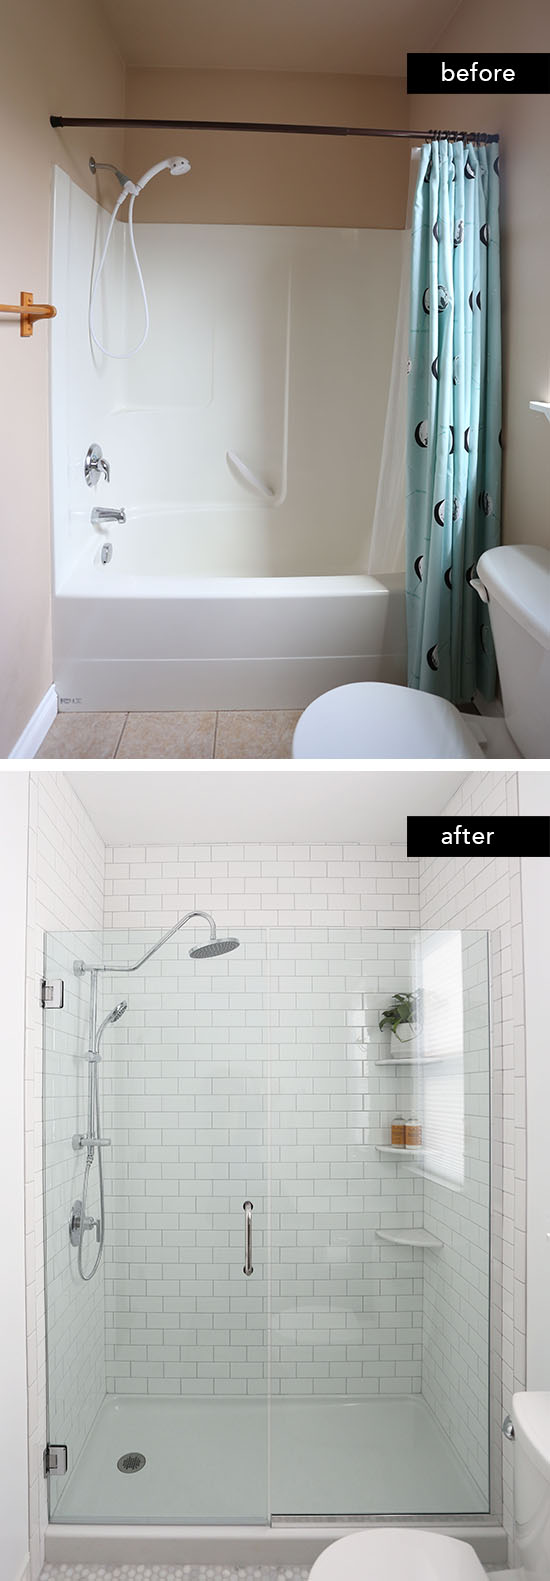
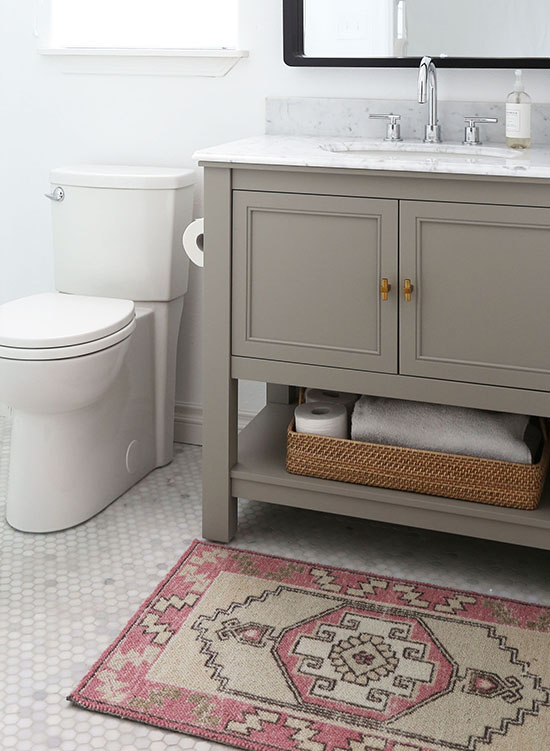
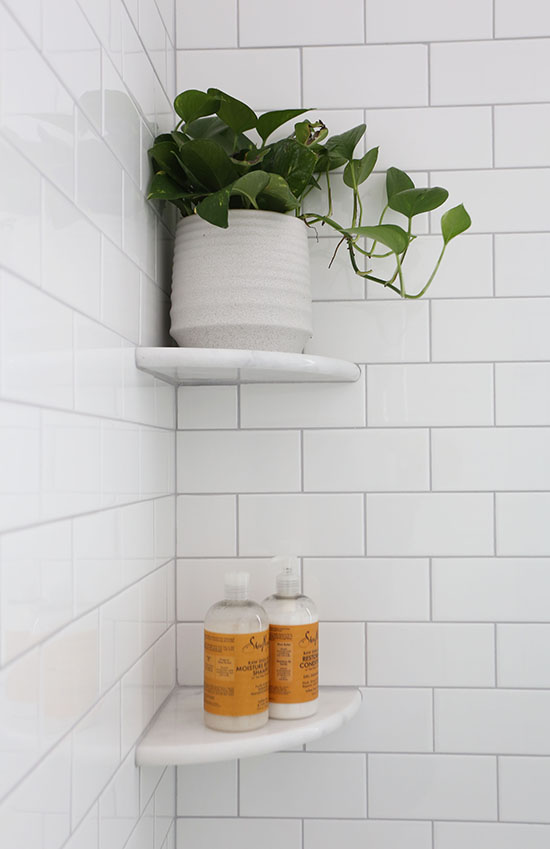
One thing I did know I wanted was marble--somewhere, somehow. At first, I was thinking wall tile, but it was going to cost a lot to tile the whole shower with marble. So we decided to do marble on the floor since it was much less square footage to cover, and used budget-friendly subway tile on the walls instead ($1.76/sq ft). I found marble hex tile on sale at The Home Depot and a vanity with a pretty marble top, to give us touches of marble without breaking the bank. We also saved money by using a readymade shower pan that fit exactly where the old tub used to be (instead of a $$ custom tiled pan). Other things we vetoed due to the extra expense: multiple showerheads, tile baseboards, and a recessed shower niche. They could have been nice, but were not necessary to make this bathroom feel fresh and updated. Instead, we chose a showerhead combo kit that still feels luxurious, the same baseboards we have in the rest of the house, and corner shelves in the shower. One small but worthwhile splurge...we got epoxy grout which is supposed to be extremely durable and stain resistant. I'll gladly pay a little more upfront for less cleaning in the future! We used the Fusion Pro line (which our contractors recommended) in Platinum.
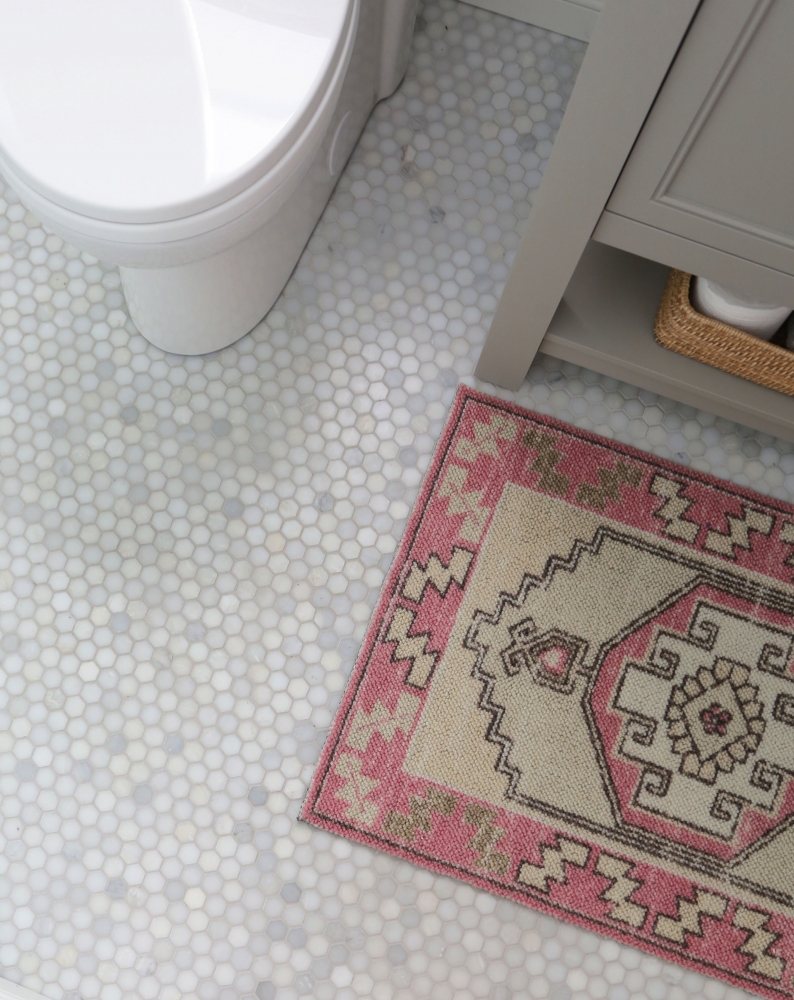
I've heard that a good way to prioritize a remodel is to think about what pet peeves you have with the current space, and solve those problems. For me, some of those things were minor details...and yet they are some of my favorite updates because I remember how annoying they used to be. Those improvements include: a single post toilet paper holder so it's easy to slide a new roll on (we used to have one of those spring loaded ones), a toilet with straight sides (so we don't have to clean around all those curves), two towel hooks instead of one towel bar (so we each have a place for our own towel), and generous corner shelves with plenty of room for shampoo, etc. (our old tub surround had barely any space and bottles were always falling off--the worst!).
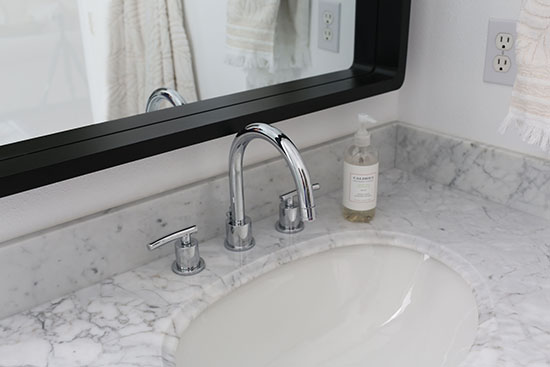
Probably my favorite thing about this bathroom is the glass shower door. It really opens up the room and makes it feel bigger...and it's so nice to have lots of natural light coming in while you're showering. I'm also proud of finding the modern sink faucet (which looks verryyy similar to other ones that cost 5x as much), and the pink rug by Momeni. It gives off the same vibe as a cool vintage rug, but is super budget-friendly--which is funny since it's probably THE item that we've gotten the most compliments on.
It's no secret that most remodel projects run into unwelcome "surprises" along the way, and we had a few. Thankfully, they were minor and easy to remedy (that's one good thing about buying a relatively new builder house!). The biggest thing was that the old light was off-center from the vanity, which was hidden since it was mounted with a bar backplate. Rather than messing with the electrical work and patching the wall, we found another light with a bar backplate. It turned out to be a happy accident, because I really love this light--more than the one I originally picked. The modern shape is fun and unexpected, and the brass finish brings in some warmth to a room that is otherwise very cool. I got some brass knobs for the vanity to tie it in, and I'm going to hang some art in a brass frame as well. Mixing metals is very trendy at the moment, but I decided it wasn't a huge risk to try. None of those items are super hard to change if we change our minds in a few years, and I'm loving the look right now!
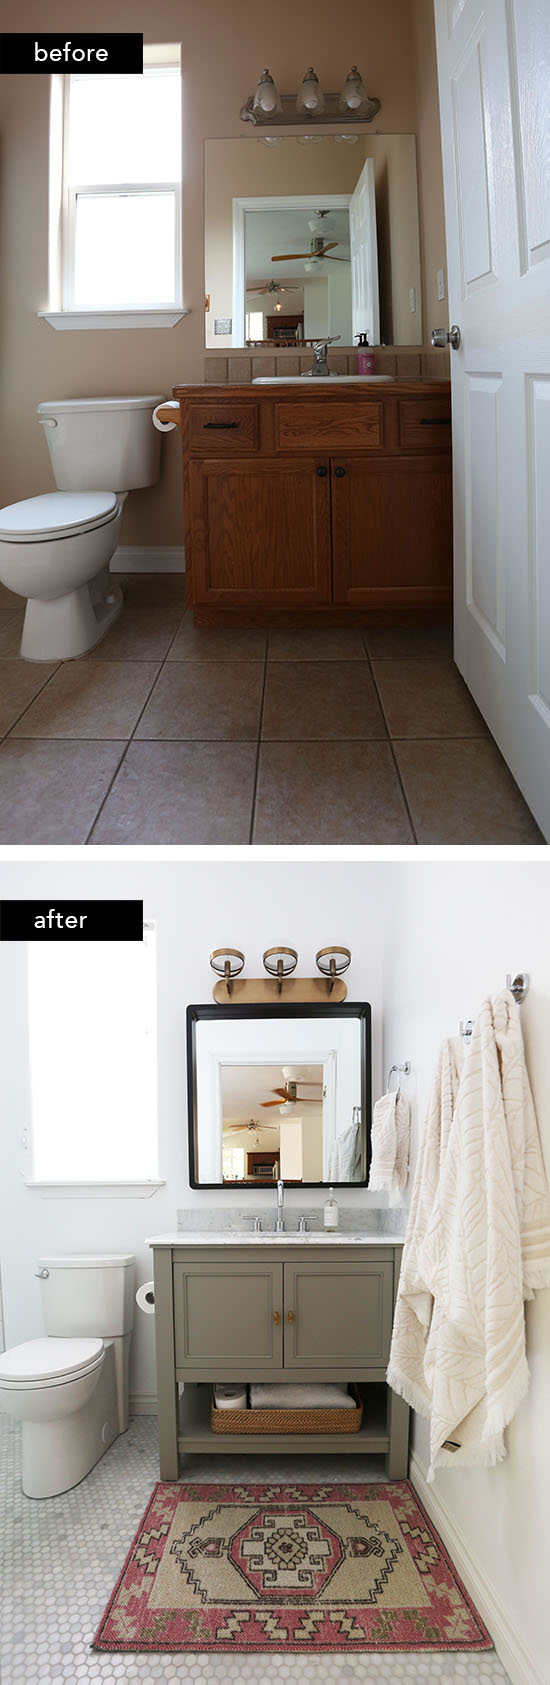
The other thing we had to modify from our original plan is the mirror. I originally picked this beautiful, round, chunky, wood mirror that I thought would be a statement piece in the bathroom...but it was a little TOO chunky and it hit the faucet (dangit!). This black rounded corner mirror was my second choice and I think it works, but I'm not sure if it's right. It's a great mirror, and a great price ($81!) but I might try one more mirror. Since we changed the light fixture to one that makes a statement of its own, I think a more slim and low-profile mirror could work better. What do you think? I moodboarded and measured the heck out of this bathroom, but it's still hard to tell how everything will work together until you physically get it all in the space. So I'm cutting myself some slack...if the mirror is the only thing I'm not 100% satisfied with, then I did pretty well!
I'm always curious to see how much remodels cost, so here is a budget breakdown of the main design elements:
Floor tile: $237 (on sale for $7.99/sq ft) / Wall tile: $154 ($1.76/sq ft) / Grout: $110 / Glass door: $586 / Showerhead: $167 / Shower pan: $233 / Vanity: $899 / Knobs: $6 / Toilet: $269 / Rug: $39 / Mirror: $81 / Light fixture: $209 / Faucet: $68 / Towel hooks: $27 / Towel ring: $19 / Toilet paper holder: $16 / Paint: $30 / Pothos plant: $17
Total = $3,167
We also hired out part of the labor and paid for miscellaneous supplies like backerboard, silicone, thinset, etc. Overall, it was a pretty budget-friendly bathroom remodel!
We use this room every day since it's the only bathroom on our first floor, and it still gives me a jolt of satisfaction every time I walk in. We debated between starting with the guest bathroom or our master bathroom, and I think we made the right decision--especially since we can still shower down here, but we can't exactly have guests use our bathroom.
We truly recommend all the choices we made and could not be happier with this remodel. Now I'm eyeing all the rooms in my house like, "who's neeeeexxxt???"
Read more about this project on the Home Depot blog!
14
So, I still have not ordered a new light for over our dining table because...Ben and I cannot agree! My husband, who hardly EVER voices an opinion when it comes to interior design, really wants to keep a ceiling fan there. I timed this project very poorly, as it was 107 degrees last week. So yeah, I have to admit, we've had the fans going nonstop and they have been nice practically speaking. But duuuude, the dining room is the best opportunity for a beautiful pendant or chandelier! I'm not even one of these people who is against ceiling fans on principle. I know they're nice for moving air around and keeping energy bills down, and there are a lot of options nowadays that look good. I'm totally cool with fans in other rooms...but I'm just not a fan of them over the dining table! Ahaha. Puns aside, after a couple heated arguments, I decided to look for inspiration photos to see if I could get onboard with this idea. I definitely hate the fan we have right now. But if we got a prettier, sleeker, more modern fan, could it look okay? I had a hard time finding examples of this, but I did round up a feeewww visuals that aren't bad. What do you think? Are ceiling fans a huge no-no in the dining room? Will they fling dust all over our food and cool dinner down way too fast? Would it be a travesty to waste that space where we could have put an amazing light? Or should I give in to my husband for the sake of marital peace, since he is kind enough to let me decorate however I want for the most part? Do any of you have a fan in the dining room?
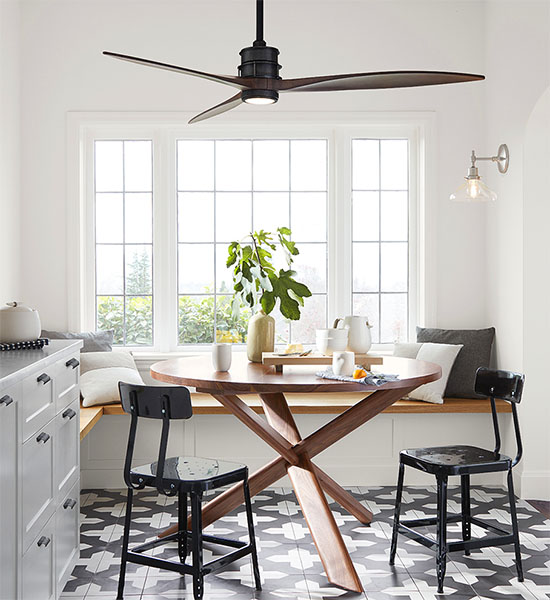
via Rejuvenation
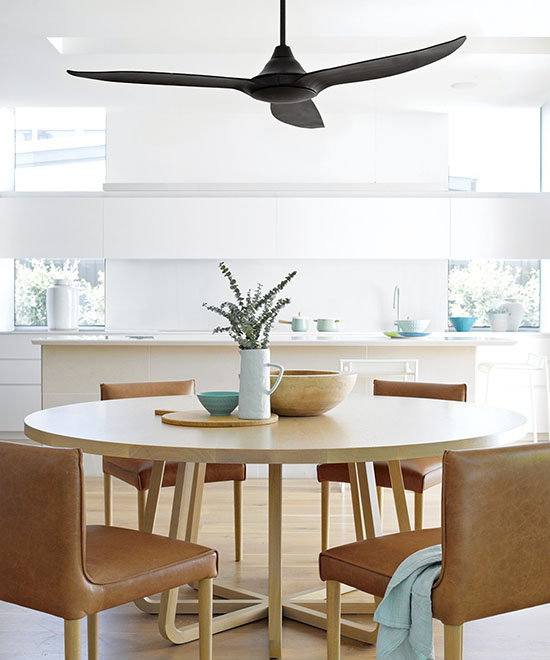
via Beacon Lighting

via Elle Decor

via Monte Carlo
09
When we were demo'ing our bathroom, Ben mentioned that it felt wrong to be tearing out something that functions perfectly well just because of aesthetics. I reminded him, that's exactly what we said we wanted: a house that's structurally sound, but with room for cosmetic improvement. And yet, it did feel weird! It's one thing to renovate an older house with obvious damage and wear; it's quite another to remodel a relatively new house with no underlying issues. But if I thought remodeling our (less than 20 year old) house felt a little funny, here's an account that is way more extreme! I recently found @philip_or_flop through Instagram, and I'm totally intrigued. There are plenty of people who are renovating old houses or building custom new houses. But Philip and his wife Jenni took a different approach: buying a new construction builder house and immediately changing things to make it their own. Yep, they started ripping apart their brand new spec house as soon as the builders were done! Now, that might sound totally crazy and financially unwise, but Philip explains the reasons why they're doing it this way, and I have to admit...it makes sense. Custom homes are really expensive, and by choosing a house in a preplanned neighborhood, they were able to get a brand new home without the huge expense. They're also in a location they prefer--within walking distance to their daughters' elementary school, close to a historic downtown area, and not way out in the country (so their commutes are reasonable).
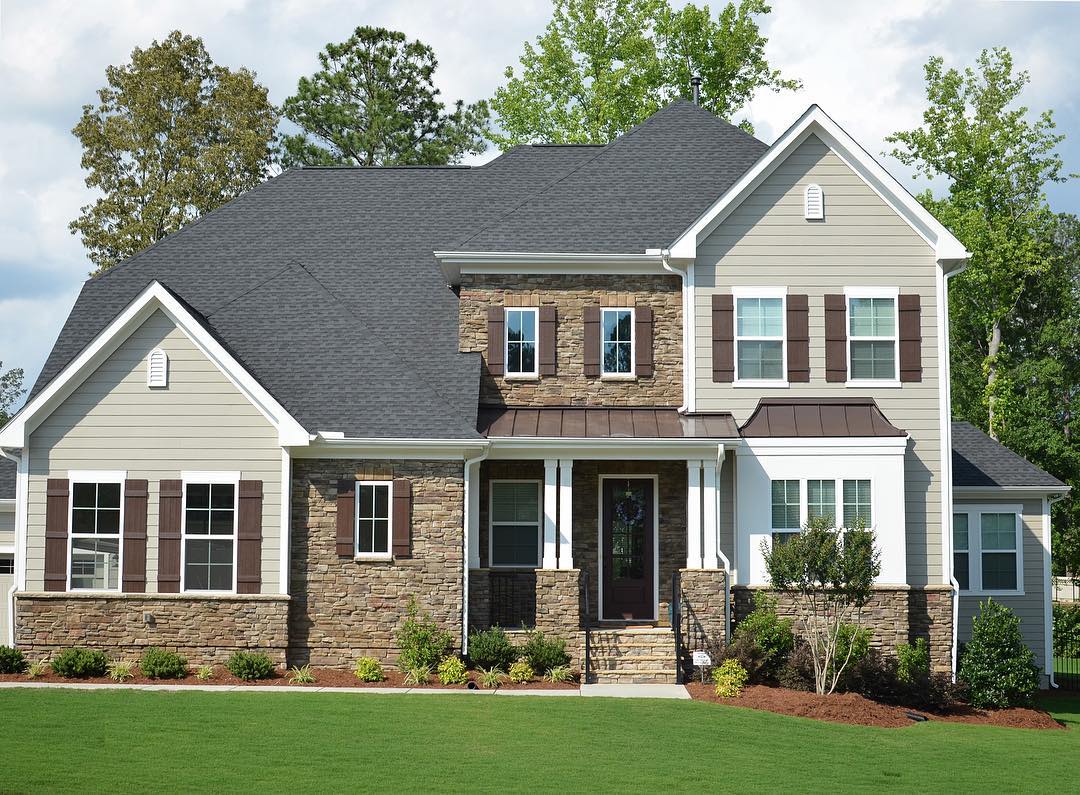
So why not an old house? He doesn't say, but I will speculate based on our experience. I have always loved the look of old houses, but after house hunting ourselves, we quickly realized that most old houses just aren't the right size or layout for how families live today. Many of them have small closed off kitchens, short sloping ceilings, and tiny kids' rooms, and almost none of them have master bathrooms, A/C, or main floor laundry. Plus, unless someone else has renovated before you, they'll likely have either outdated electrical and plumbing, foundation issues, asbestos ceilings, an old roof, or some combination of those--all of which which are expensive to fix and not DIY-friendly. For those reasons and more, a lot of Americans (including us!) live in developments with builder homes. If you're in the same boat, I think Philip's account will be really inspiring. He shows how they are making a boring builder home look WAY more custom and high-end. Instead of splurging on expensive upgrades from the builder (with limited options), they are doing the work themselves and getting it exactly how they want it. Philip says in his first Instagram post, "They always say 'you should buy the worst house in the best neighborhood.' This is kind of hard to do with new construction so we adapted this motto to mean we didn't pay for any of the builders overpriced options. This way we were able to afford much more house than we would have otherwise, will allow us to pay as we go and have a clean slate to transform the house to our own personal style." It's an interesting challenge, and a different approach than most house flippers and renovators you see. And they're doing a beautiful job so far! Here are a few of my favorite before & afters from his home.
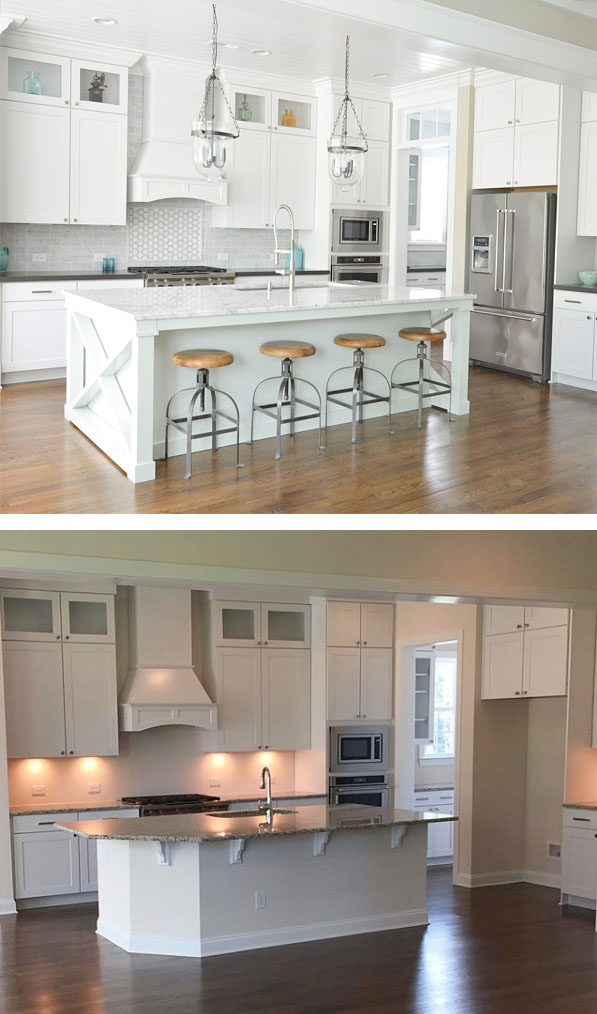
Their gorgeous kitchen looks completely different with a Carrara marble topped island, DIY concrete countertops, tongue and grove ceiling, transom windows, double chandeliers, and marble backsplash with a pretty inset over the stove.
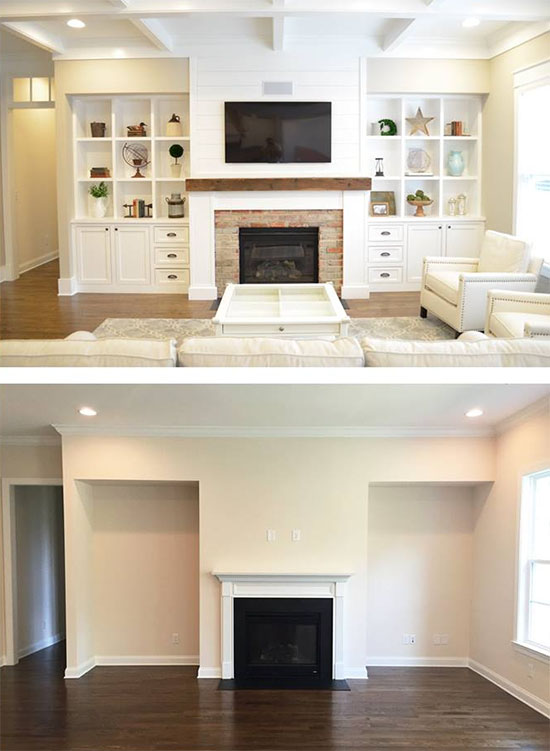
The living room went from a bland room with a boring fireplace, to a gorgeous space featuring a beamed ceiling, reclaimed oak mantle, reclaimed brick fireplace surround, shiplap chimney, and custom built-ins.
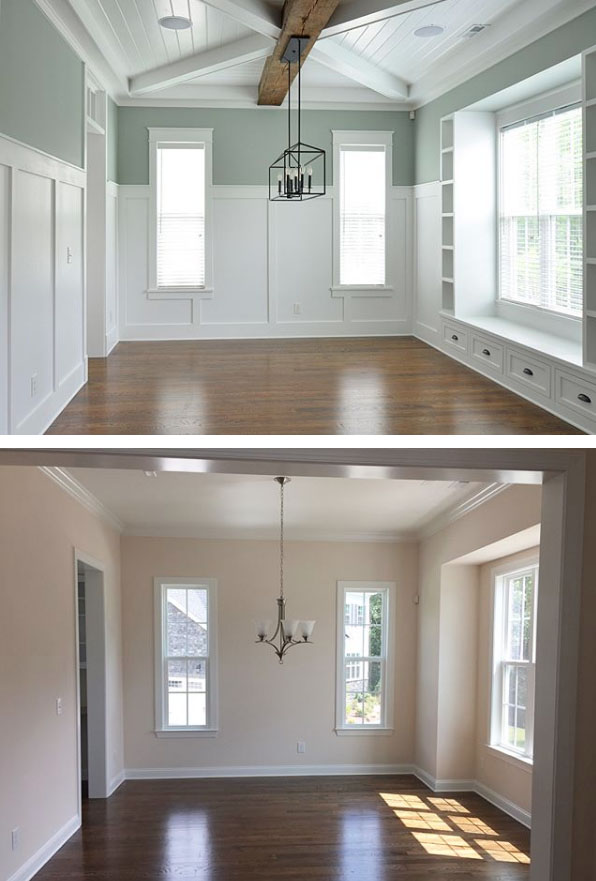
The dining room transformation included a reclaimed barn beam, tongue and groove ceiling with crossing beams, wainscoting, a window seat with built in storage, new paint, and a gorgeous light fixture.
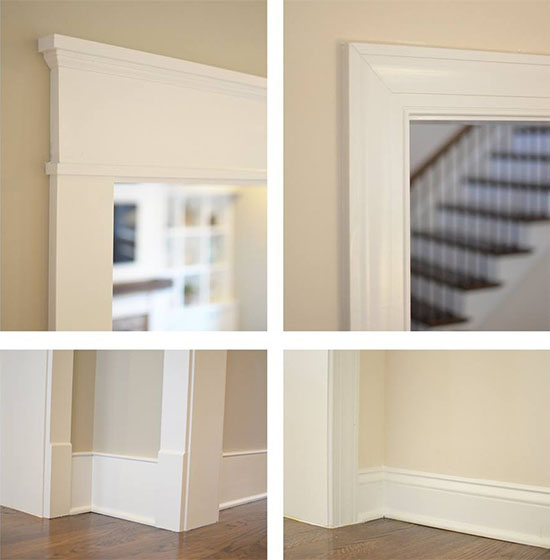
And they didn't leave out any details. They are re-casing the ENTIRE house with Craftman style trim and 8" tall baseboards! Kind of a crazy amount of work to put into a brand new, "move-in ready" house, amiright???
I'm so curious to hear what you all think of this. Does it seem terribly wasteful to rip out a kitchen island that's never been used? Or does this seem like a smart way to get the home you want without the cost? Would you ever consider remodeling a new construction house? Gimme your thoughts! This whole idea is totally fascinating me right now. If you're interested too, make sure to follow Philip @philip_or_flop!
- Search
- Archives
