17
This is a collaborative post. All opinions are my own.
Back in December, when I was heavily pregnant in the middle of winter, I started looking for ways to get my groceries and household essentials delivered to my door. Little did I know that a few months later, the entire world would be looking for ways to grocery shop without leaving their house! I feel lucky that I had already done my research and figured the process out. And now that we're all learning how to minimize in-store shopping, I have a feeling this shift in grocery shopping habits will last even after the lockdowns are lifted. I'm predicting that grocery delivery will be the new normal for many families (ours included). After all, it is super convenient to have food and essentials show up on your doorstep instead of having to drive to the store and stand in line. Especially if you have little kids that you have to buckle into car seats! I've tried pretty much all of the services, and these are my two favorites.
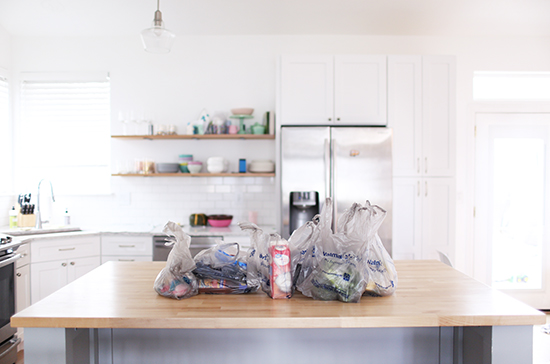
1. Walmart Grocery: I love Walmart Grocery because, unlike Instacart and Shipt, they don't add an upcharge to their items...everything is just the same price you'd pay if you shopped in person (and Walmart prices are good). Instead of upcharging individual items, they charge a straightforward monthly service fee for unlimited deliveries: $12.95/mo or $98/year (which works out to $8.17/mo). It's honestly a great deal; I'd easily spend $8 a month on gas driving to and from the grocery store, not to mention my time. You can also sign up for free pickups, where you just pull into the designated parking spots at the store and a Walmart employee will come out and load your groceries in the trunk. I've done both, but I definitely prefer the deliveries. The only problem right now is finding an available time slot! With so many people looking for ways to get groceries delivered while in quarantine, the slots (which used to be readily available) are harder to get. I think they release new slots at the top of the hour so what I've been doing is getting everything ready to go in my shopping cart and refreshing the page right when the clock turns. Anyways, this one's pretty well known but if you haven't tried it yet, you can get $10 off your first Walmart Grocery order through my referral link.
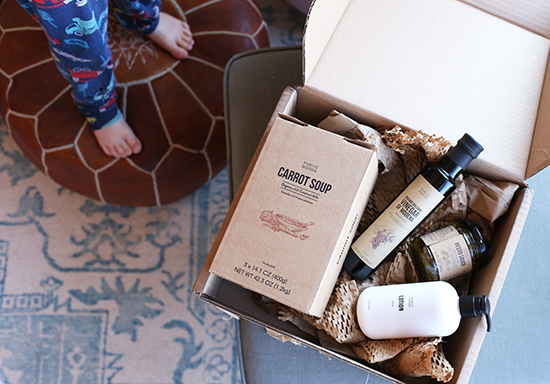
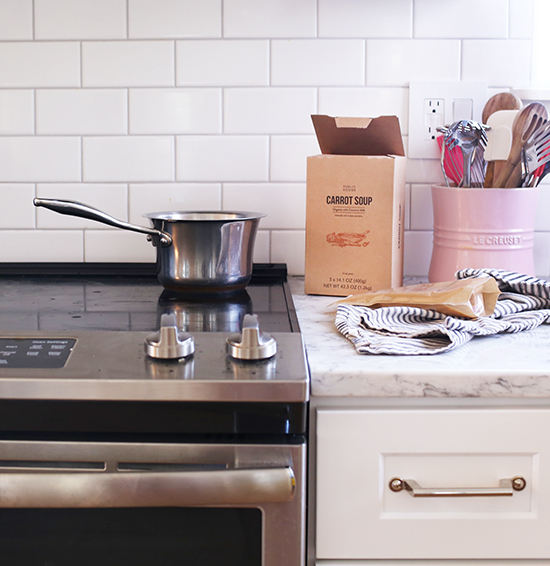
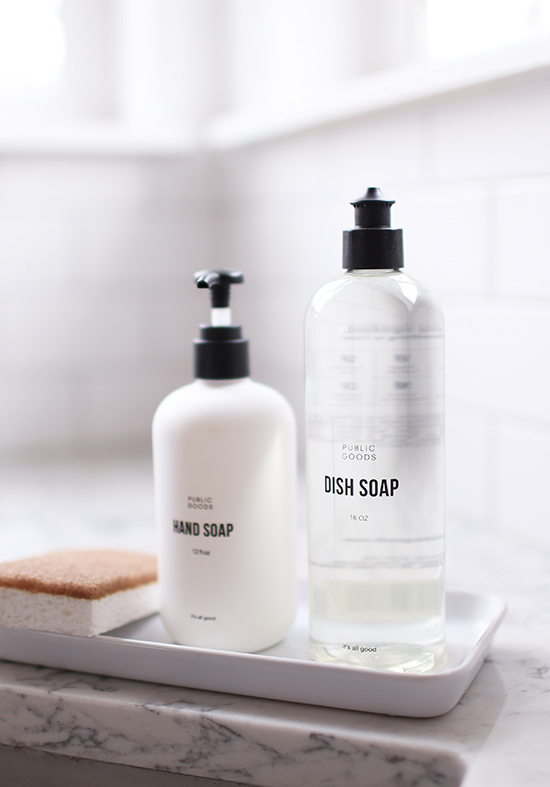
2. Public Goods: For a service that's more of a hidden secret, try out Public Goods. I wrote about them in this blog post, when I was mostly using them for toiletries and household essentials. Since then I have ordered more of their food items, and we love everything we've gotten. They are great for pantry goods that don't need to be refrigerated. Their selection is obviously more limited than a grocery store, but they have a good variety of food and snacks, at surprisingly great prices. Their packaging is also beautiful which makes it perfect for care packages and gifting. We recently tried their carrot soup which was super yummy! They also carry great personal care and household items including tree free paper towels, surface cleaner, hand soap, and lotion (because who else has super dry hands from all the hand washing they've been doing?). I also appreciate that their products are cruelty-free and their packaging is recyclable or compostable whenever possible. If you're interested in trying them out, get 15% off your first order with my affiliate code AILEENPGA.
Let me know if you already use either of these services, or if you end up trying them! I'd love to know what you think.

17
This is a collaborative post. All opinions are my own.
I believe that there are going to be some truly positive side effects that come out of this time of quarantine...and one of those, I hope, is that families grow closer together. With all this time at home, and with our own family members being the only ones we're supposed to see in person (at least within six feet), I think we're all spending more time than usual hanging out as a family. And while I miss my friends, I love the extra family time! After all, Ben and my kids are my favorite people in the whole wide world. But of course, just being physically together in the same room isn't the same as intentionally planning activities to bond together as a family. So with that in mind, here are some ideas to build stronger bonds with each other.
1. Cooking & Baking
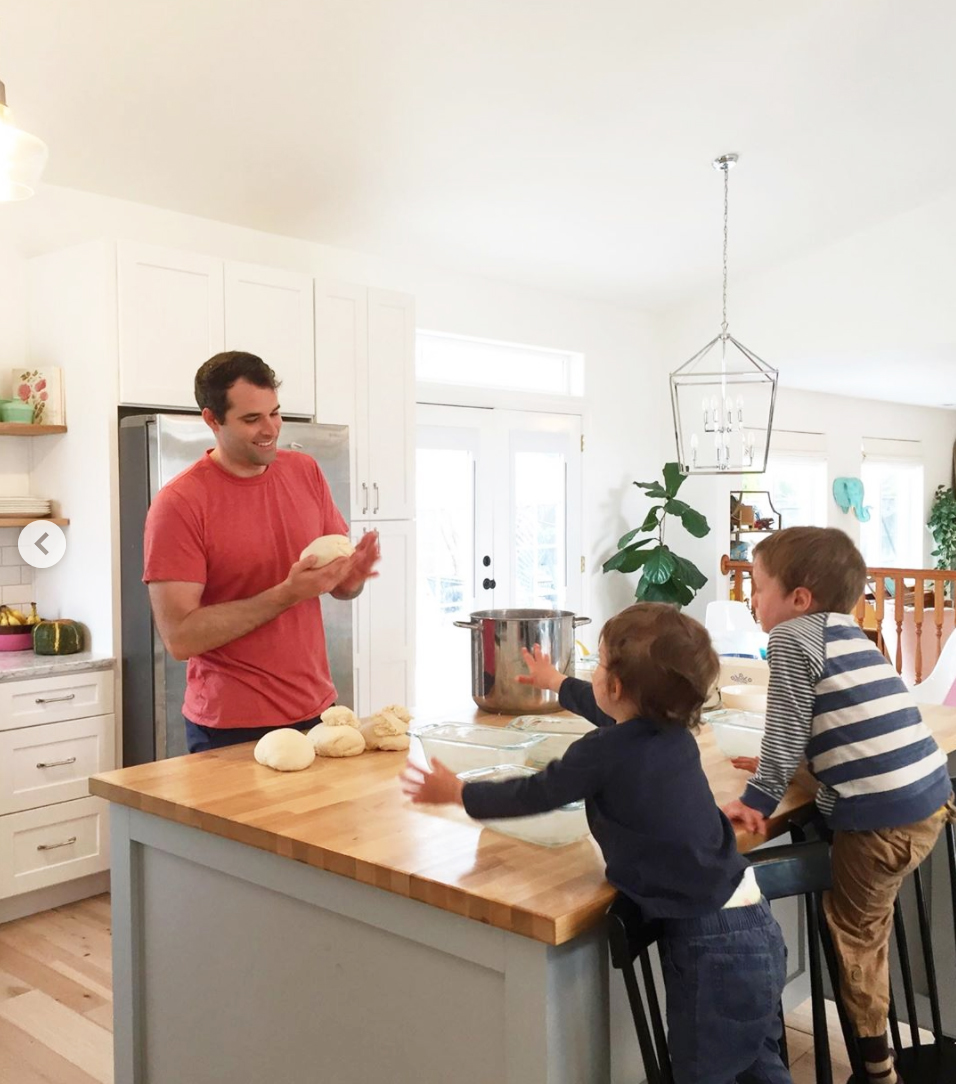
Our kids love being included in cooking and baking. They're too young for chopping or doing very much by themselves, but they think it's so fun to help in any way they can...whether it's washing vegetables, measuring and adding spices, or simply pressing the buttons on the rice cooker. When Ben bakes bread, he always lets the kids be a part of the process by giving them their own pieces of dough to knead and pat into little mini loaves. In general, cooking together as a family is a great way create memories, share a fun activity, and feel closer to each other. You can let the kids pick what to cook sometimes, or choose meals where they get to have some responsibility and involvement...like building their own pizza with toppings of their choice. Not only will you be bonding with your kids, but you'll also be helping to teach them one of life’s most important skills--cooking.
2. Eating Dinner Together
Once you've cooked that meal together, of course you have to sit down and enjoy the fruits of your labor! Family dinners used to be a basic staple of family life, but in today's busy world they've fallen to the wayside...which is a real shame. Ben and I have decided that eating dinner together is something we always want to prioritize. It doesn't have to be a homemade dinner (takeout or eating at a restaurant counts as well), just as long as we're all eating together as a family every night. The stability of this time is a comfort for kids and it gives the whole family a chance to catch up and know what's going on in each other's lives. I think that's so important.
3. Family Movie Night
Our kids are still pretty young so we haven't done this yet...but it's something I'm looking forward to sharing with them! I think it would be fun to make family movie night a special tradition, with popcorn and treats and everyone cuddling and hanging out. Then we can discuss the movie together and be there to answer any questions our kids have. So far I've only let my kids watch shorter shows, and usually I try to get some cooking or cleaning done while they're watching...but for movies, I'd like to sit down and watch with them sometimes. That way, I'll understand their references and know the songs as well. Showing that you care about what your kids are interested in is one of the best ways to bond with them...so if that means singing songs about garbage trucks, I'll do it!
4. Exercise
Sports and exercise are a great way to bond with others, and that holds true for your family as well. We're not really a sports-watching family, but we do love to exercise together. We've really enjoyed taking our kids on hikes, and we're working on teaching them to ride bikes so we can do that together too. Eventually, I'm excited to share more activities with them like Frisbee, fun runs, tennis, and skiing (I've never been a skiier but I'd like for my kids to learn...so I'll have to learn along with them!). As they get into playing sports themselves, of course we will support them and be their biggest cheerleaders. Bonus: by getting active while bonding with your kids, you'll be getting plenty of exercise in as well.
5. Reading
When kids are young, it's super important to read together. Reading is one of my favorite activities and it's important to me that my children love to read as well...so this has been a big part of our daily routine since our kids were babies. But just because they get older, doesn't mean that family reading time has to stop! Ben has fond memories of his parents reading chapter books to him and his siblings, everything from Where the Red Fern Grows to Lord of the Rings. I love that! As kids get even older, you can sit with them on the couch and simply spend time in each other's company while you each read your own books. This simple act is surprisingly soothing, and a great way to feel closer as a family. Who knows, maybe you could even start a family book club in your own home...
6. Have A Picnic
With the current lockdowns, perhaps we can't have a picnic at the park or the beach right now, but we can have a picnic in our own backyard. There's something fun about eating outside that makes picnicking a classic family bonding idea...and one that's perfect right now with the warm, sunny, spring weather that we're finally getting! Even better, if you have a picnic in your backyard it'll be really easy to transport the food, and easy to run back inside if you forgot the forks!
7. Play Board Games
Ben and I love board games, and spent lots of time playing games together when we were dating and newly married. We actually have quite the stash of board games that are sadly not getting much use right now. Once our kids get old enough to learn them, I am really looking forward to building some happy memories of playing games together as a family. I think board games are a great way to get closer together and teach your kids important lessons about how to be competitive in a friendly way, and how to lose with grace (not gonna lie, that's probably something that I myself could still work on).
What are your favorite bonding activities to do together as a family?
08
I'm finally getting around to posting this! I was waiting until we "finished" the kitchen, but with the possibility of us selling our house this year, we decided to forego the last two items that were lingering on our to-do list (they were: hanging new lighting over the island and getting a counter-depth fridge). We didn't think either of those items would really change how much the house is worth, and they would have added significant cost and hassle. So we decided to be done! I had a general idea of how much we spent, but I was curious if the number in my head was truly accurate. So I pulled out all my receipts and tallied up the total--both for my own reference, and for you guys, in case any of you are planning a kitchen remodel this year. I always find it helpful to read budget breakdowns. The numbers can vary wildly depending on the finishes and the size of a space, but it still gives a good idea of how much to allocate for each line item.

When I budget out a renovation project, I always start with a target number for the total. Then I make a list of everything I would like to be able to do, and the purchases (big and little) that are needed for that. For each item, I shop online and try to find the most inexpensive options that 1) fit the look I'm going for, and 2) have good reviews. I look up rough labor estimates for each task that we'd like to hire out. Then I add a 10% buffer to the total for all the miscellaneous expenses that inevitably come up. If I'm over budget, that means I have to take some things off the list, DIY more tasks, or look for even cheaper alternatives (this could mean digging on Craigslist, Facebook Marketplace, and local scratch & dent places, or it could mean simply looking for cheaper options that aren't as pretty).
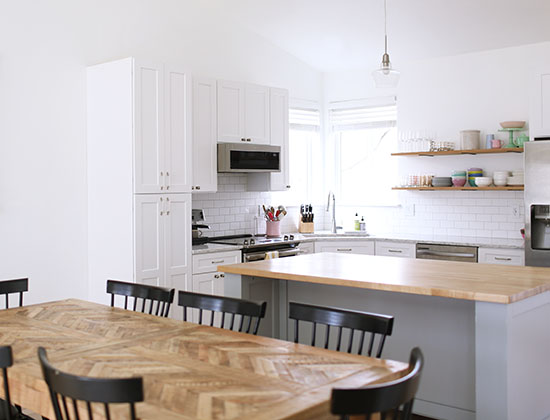
It helps me to think about my top priorities: the reasons why we're doing this remodel in the first place. We price out those items first and see what's left for the rest. For the kitchen, those priorities were knocking down the wall and replacing the cabinets and countertops. Those are some heavy hitters, so it meant a pretty bare-bones budget for everything else. We left the appliances in the same spots which kept labor costs low, we skipped any extra ideas like cutting a window on the back wall, and we chose inexpensive options wherever we could (subway tile, open shelves, etc.)
The budget we decided on was $15,000, and truthfully I was hoping to come in closer to $10,000. I've seen lots of bloggers who have done gorgeous kitchens for that amount or even less. But I think a lot of them must have painted their cabinets or remodeled a smaller kitchen...
Because even if you look for "affordable" options, cabinets are still expensiiiive. We originally tried to get some cheaper ones that would have left us more room in our budget. But when they arrived, they already had some dings and scratches...not a great sign for their durability, so we decided to return them. We were strongly considering IKEA when I found a local cabinet company that was comparable in price, and included building and installing the cabinets. I was sooo happy about this on the day of the install. He was a perfectionist and spent all day getting our cabinets exactly right. We also hired him to build an island for us: two sets of 30" drawer cabinets side by side, framed out and put on casters. All in all, the cabinets were by far our biggest expense: $6,127 for the perimeter and $2,576 for the island. The island would've been less if we didn't make it movable, but the crawlspace access is underneath it so we needed it to be able to roll out of the way (believe me, we tried to find another spot for the crawlspace access but there wasn't anything better).
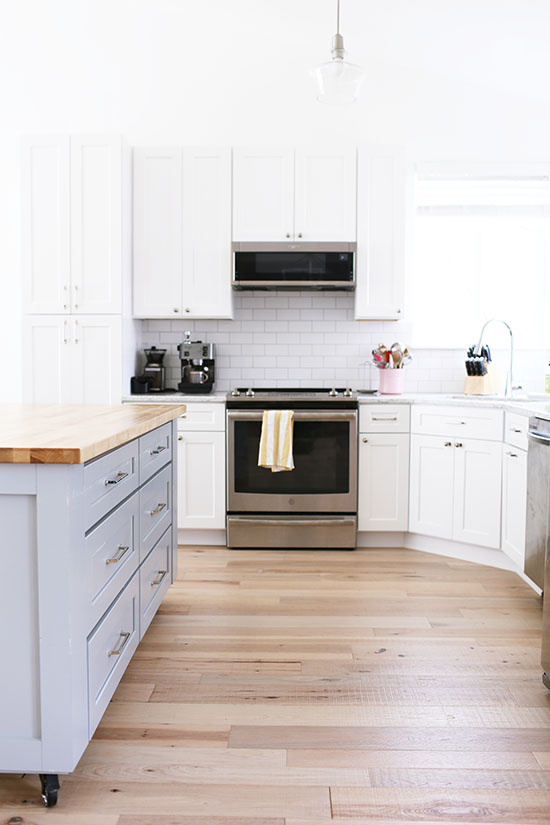
One way we saved on cabinets was by choosing the in-stock colors instead of getting them custom painted. There was a blue option he had that I loved for the island, but the total would have been $1000 extra, just for a different color. So we went with the standard white for the perimeter and the standard grey for the island. The extra things we did choose are: taller upper cabinets (so they'd line up with the windows and give us more storage space), pantry pull-outs (totally worth it!!), and a trash pull-out (which is one of my favorite features in the whole kitchen, no joke).
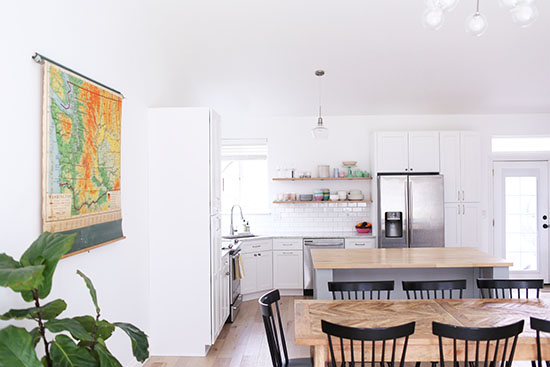
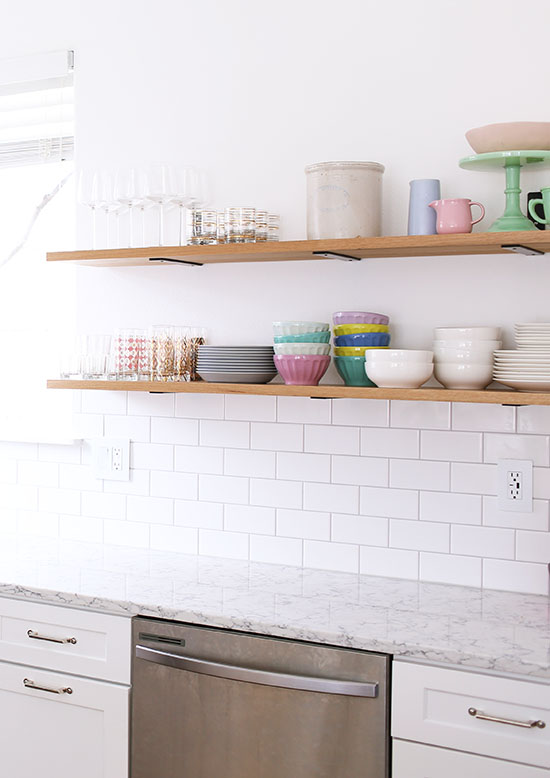
We went back and forth on doing upper cabinets or open shelves, and ended up with a mix: upper cabinets on the side of the stove, and open shelves next to the fridge. Since we lost our pantry closet and half of the upper cabinets, I was a little concerned about storage space, so I put in two pantry cabinets to make up the difference. Rather than doing them side-by-side, I put them on either end of the kitchen for a more balanced look. As it turns out, the pantry pull-outs allow us to utilize the space much more efficiently than the old pantry closet. We only use one of the pantry cabinets for food, and it actually feels like we have more space than before! The other one is used for appliances and baking dishes, which I love! It's so nice to have an organized spot to hide away things like our crockpot, toaster, rice cooker, pancake griddle, and muffin pans.
After cabinets, the next biggest line item was counters. I love the look of marble and have it in our bathrooms, but I decided to use quartz in the kitchen. I'm definitely a messy cook, so I wanted something low-maintenance! The cheapest price I found was around $1800 for a speckled light grey quartz ($58/sq ft)...but I had my heart set on something more veiny. Home Depot ended up being the best price I could find for a quartz that resembles marble (this is the LG Rococo). They were running a 20% off promo, so our counters cost a total of $2637 ($72/sq ft). That cost includes installation, which turned out great. They didn't give us any seams, yay!
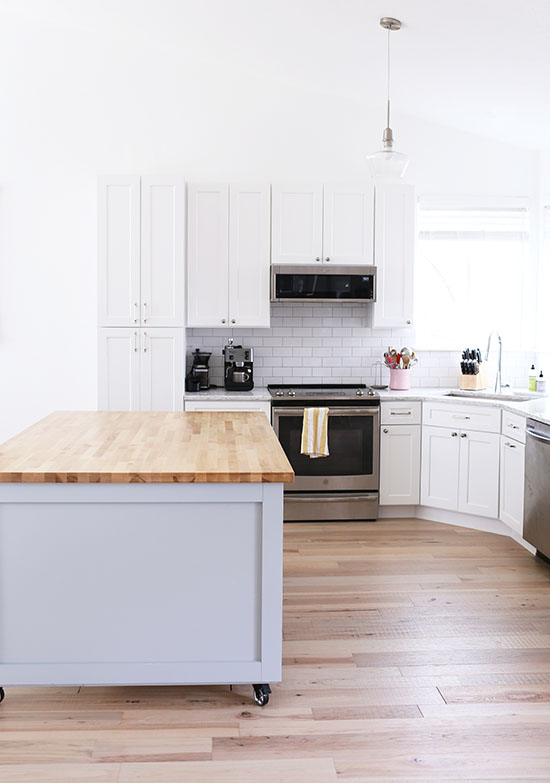
A big way we saved on counters was by only doing the quartz on the perimeter and using butcher block for the island. The butcher block was $246 for a 6' x 4' countertop (we used two of these "workbenches" glued together), whereas the quartz would have been an additional $1700 or so. I wouldn't use butcher block next to the sink, but for the island it's perfect! And I think it looks great! We sealed ours with polyurethane so we wouldn't have to worry about spills soaking into the wood.
Our third biggest expense was labor, so that's a place where you can definitely save some dollars if you're DIY-inclined. Ben actually did quite a bit himself: he demo'd the wall, repaired the drywall, painted, installed the open shelves, and more. But we decided it was worth it to hire out some of the big tasks. The two main ones were leveling out our floor (which most people wouldn't have to do) and installing the tile backsplash. In hindsight, I wish I would have tried to DIY the backsplash as the subway tile was sooo cheap. Even if I messed up and ruined some tiles, it would have been no big deal, and a kitchen backsplash is very straightforward compared to a shower. Maybe in our next kitchen, I'll try installing a tile backsplash myself. But this time, we were ready to be done, and nervous about DIYing something so visible. We spent about $2800 on labor, including those two big tasks and some random ones.
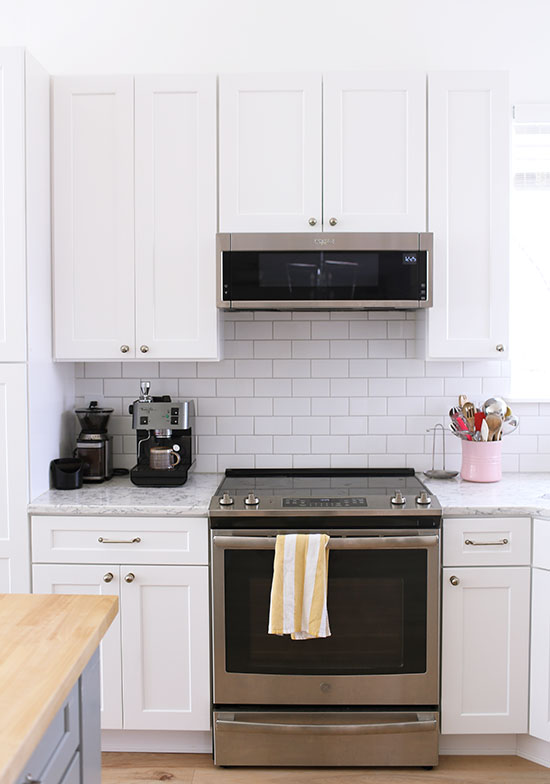
Those three items ate up nearly all of the budget already, and I haven't even touched on APPLIANCES. Originally, appliances were something we had taken off the list as we were allocating our budget. Our thought was to keep the existing appliances and upgrade them in the future, once they stopped working. But I started feeling like we really needed to get a new range and microwave along with the remodel, since they would affect where the tile backsplash started and stopped. I really wanted a low profile microwave and a range with front controls instead of a back panel. To justify the cost, I sold our old range, our old microwave, and our old cabinets on Craigslist, which gave us about $1000 extra to work with. I checked out local scratch and dent places and Craigslist, but in the end we chose ones that were on sale at Home Depot. We spent $398 on the microwave and $1098 on the range. Thennn our dishwasher stopped working so we ended up replacing that too. $378.
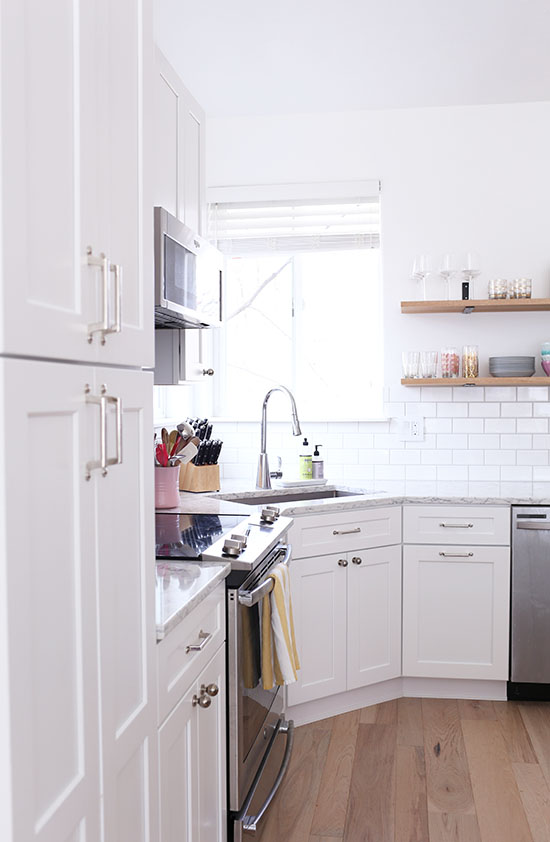
If I add up everything so far and subtract the $1000 I got from selling our old stuff on Craigslist, we're already at $15,260. So obviously, we didn't quiiite stick to our budget. But we actually got pretty close! I was able to get a few things gifted to me through blogging, which helped us a lot. We saved $1450 on the kitchen sink, kitchen faucet, and cabinet hardware, and I love the ones we got. You can read more about the sink and faucet here--as well as why we decided to do a corner sink. I've shared about the cabinet hardware on Instagram, but I should do a blog post as well because there's actually a lot more to that decision than you might think! I chose these knobs and these pulls, from an awesome Spokane-based company, The Hardware Hut.
For the tile, I considered getting something more unique, but I really like classic white subway tile so why fight it? It doesn't hurt that it is ridiculously cheap at $1.20/sq ft. I'm pretty sure we spent around $50 TOTAL on the tile itself (maybe even less!).
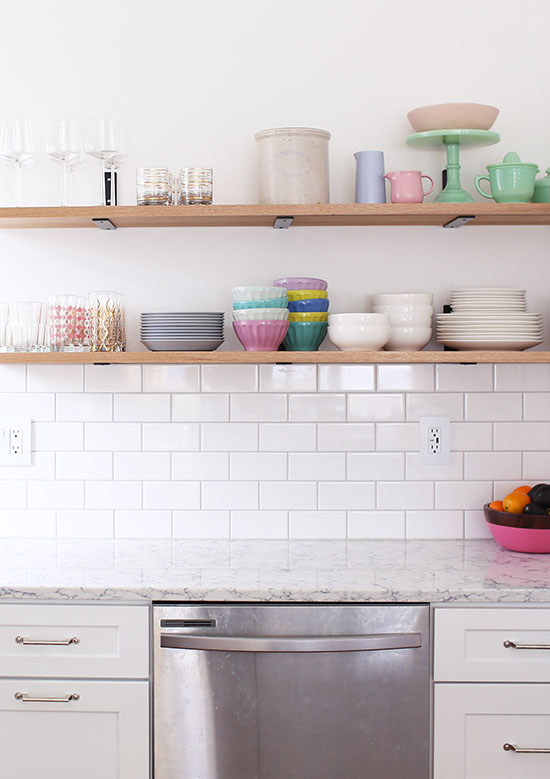
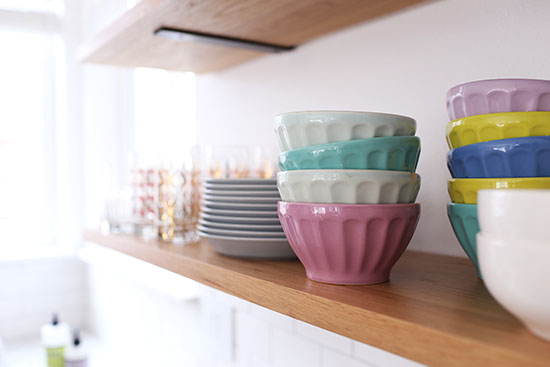
The last detail was the open shelves! I loved the look of chunky floating shelves, but I was seeing around $400 for one 5' x 1' shelf (and we needed two!). The point of doing open shelves instead of upper cabinets was to save money, so I quickly ruled that out. Then I saw this tutorial using stair treads (genius!!!). They are thicker and nicer than a standard piece of lumber, 12" deep (just right for holding dinner plates) and come in a variety of lengths and types of wood. We got two 5' long white oak treads at $53 each, plus some brackets on Amazon. The total cost was $220 for TWO shelves...much better, and I think they look perfect. Definitely a good money-saving trick.
We probably spent another $200 on random things like the garbage disposal, drywall for patching the wall, sealer for the butcher block, and so forth. It's also worth mentioning that our food spending increased during this time. We tried to cook at home as much as possible, mostly grilling and eating cold foods like chicken salad. But we did buy more prepared foods from Trader Joe's vs. making everything from scratch, we ate out more than usual, and we ordered our fair share of pizzas. I'm not going to count that as part of the actual remodel cost, but it's something to be aware of!
Long story short, we went over budget a little bit, landing at $16,730 (or $15,730 if you subtract the money I got from selling our old kitchen stuff). In hindsight, especially now that I know we might sell the house, I would probably choose the cheaper quartz counters (would have been $800 less). I also could have tried to install the tile backsplash myself (would have been $1200 less). With those two changes we could have come in under budget. But then again, $2000 isn't a huge difference with a project of this scale. I think we did ok!
Here is the breakdown of our budget, with links to all the sources:
Cabinets: $6,127
Movable island on casters: $2,576
Quartz counters: 2637
Butcher block counters: $246
Tile: $50 + $1250 for installation
Grout: already had (Fusion Pro Platinum from HD)
Range: $1098
Dishwasher: $378
Microwave: $398
Open shelves: $160
Brackets: $60
Other labor: $1550 (leveling the floors, plumbing for the sink, joining the two butcher block pieces, etc.)
Miscellaneous: $200
Minus $1000 for selling items on Craigslist
= $15,730
Plus the items we received through blogging and what they would have cost:
*Kitchen sink: $799
*Faucet: $249
*Knobs & Pulls: $405
There are obviously more important things going on in the world right now than a kitchen remodel, but I actually think that planning out projects can be a good distraction from all the negative stuff! So with that in mind, I'm still planning to write a few more posts about our kitchen...like lessons learned/regrets, and how to choose & install cabinet hardware. Is there anything else you'd be interested in?
08
This is a collaborative post. All opinions are my own.
One of my parenting goals is to give my kids a lifelong love of reading. From the time they were all babies, I have tried to make books a part of their daily life. I read to them multiple times a day, we go to the library regularly (when it's not closed due to Covid-19) and we have an entire reading nook filled with interesting kids books that they flip through themselves. I've heard Ian sitting in there "reading" books that he's memorized to Emmett and it totally warms my heart. Recently, I've started trying to give Ian some reading lessons. He's not even four yet, so I'm not expecting much...but I'm hopeful that starting early and making it fun will set him up to be a reader! Since I'm clearly not an expert, I've been doing some research (and I'd love to hear your tips too!). Here are some suggestions I've seen, to make reading lessons enjoyable and successful.
Incorporate Blended Learning Materials
When teaching young children how to read, blended learning materials can do you a world of good. Unsurprisingly, many children become bored when dealing with large amounts of text. On the flipside, blended learning materials can help shake things up and keep even the most easily-bored kids entertained. As the name suggests, blended learning incorporates a variety of media types into reading lessons, thereby keeping children engaged and interested in the material. Certain blended learning materials also include gamification elements, which can make reading lessons feel more like leisure activity and less like work.
Use Reading Materials That Interest Your Child
One of the reasons young children find reading lessons unappealing is a lack of interest in certain reading material. And as any parent can attest, if a child finds something boring, he or she is likely to tune out. If your child has shown a distinct lack of interest in the material you’ve selected, start incorporating books that interest them into your lessons. As long as the material is well-suited to your child’s reading level, be open to using any books that they express an interest in. Make trips to your local library or bookstore part of your regular routine. While there, give your kids the freedom to choose books that appeal to their individual tastes. Even if their picks are heavy on illustrations or qualify as comic books, make sure to keep an open mind – provided, of course, the books are age-appropriate.
Incentivize Progress
When tasked with learning a new skill, most children’s first thought is “What’s in it for me?” Sure, learning how to read is its own reward, but young children don't exactly comprehend the ramifications of lackluster reading abilities. Many of them will need a little bit of incentive to commit themselves to improving their literacy. With this in mind, consider enacting a system that rewards your kids for any progress they make. For example, for every book they successfully finish, you could buy them a small gift, reward them with a tasty treat or take a trip to a favorite park or restaurant.
Encourage Creativity
If you have a child who prefers to take a hands-on approach to learning, why not incorporate some creativity into their reading lessons? Since reading and writing go hand-in-hand, parents could task their children with writing and illustrating their own stories to complement the ones they’re reading. Not only will this help them build solid writing skills, it will nurture individual creativity and make kids more amenable to expanding their intellectual horizons.
In the end, I think the most important thing for young kids is to have you involved. Have it be a special time, where they get to be with you, and get your full undivided attention. Be encouraging, let them go at their own pace, tell them you're proud of them, and try to keep it low-pressure and fun.
What advice would you add?
- Search
- Archives
