15
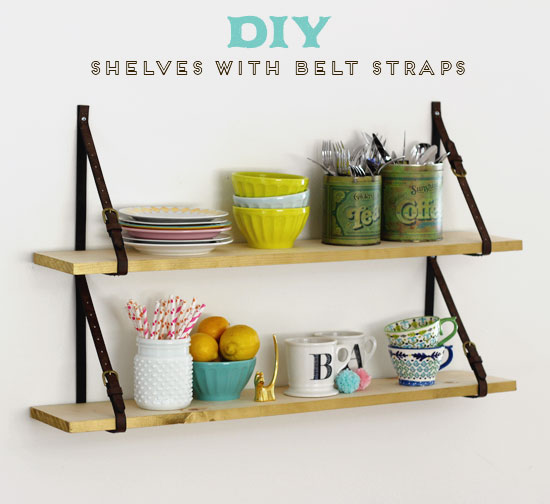
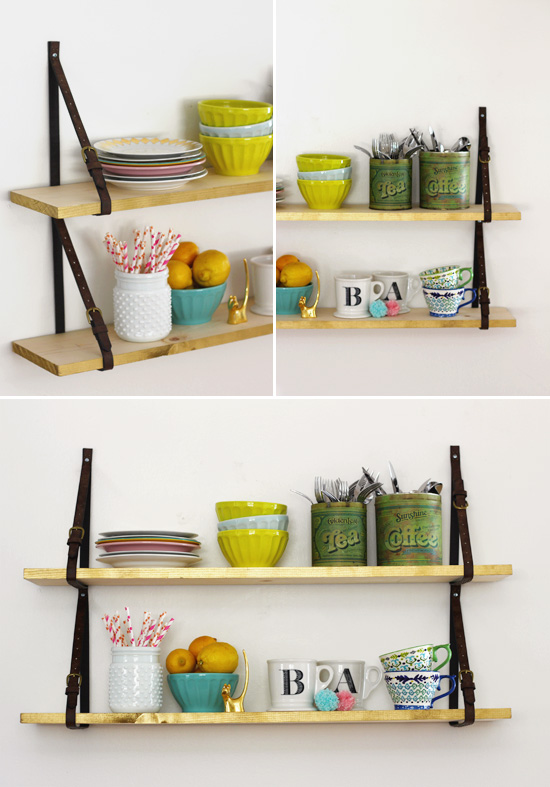
Remember last month, when I shared this photo of a wooden shelf with leather straps holding it up? Well, I made my own version a couple weeks ago for my dining room! I was really happy with how my DIY shelves turned out, and they weren't too difficult or expensive (plus they have way more character than most store-bought shelves). Definitely worth doing! I have to give credit to my husband Ben, who installed them for me after getting home from a really hard two-day bike ride. Thanks, sweetie!
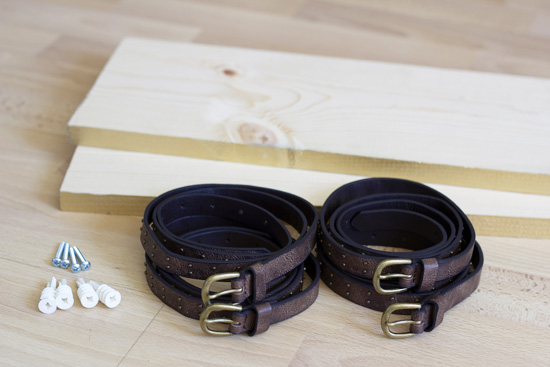
For this project, you will need:
-board(s) from the hardware store, cut to the desired length. We bought a 6 ft long board and cut it in half--$7
-paint in the color of your choice & blue painter's tape (optional)--$4 for the paint, the painter's tape we already owned.
-four belts or leather straps, about 1" wide--$6 per belt
-four drywall anchors, a drill, and a philips screwdriver--$5 for a box of drywall anchors, the drill & screwdriver we already owned.
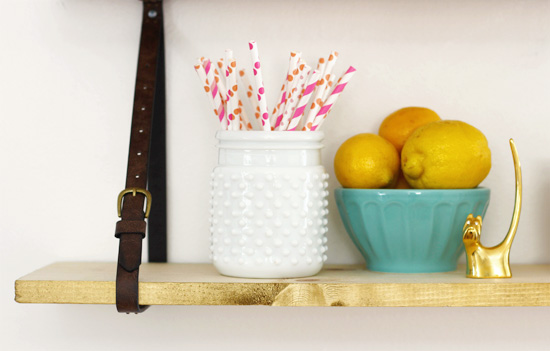
I painted the edges of my boards with gold spray paint, masking everything else with blue painter's tape. You could edge-paint the boards any color you like, or leave them wood--it's up to you. A bright pop of color would be really fun, but I like the subtlety of the gold. You almost can't tell they're painted until the light hits at a certain angle!

For the leather straps, we went to Tandy Leather to find some cowhide strips like in the tutorial I was inspired by. The ones they had were $17 apiece, which was a bit more than I wanted to spend. So I started thinking...Forever 21 and H&M are always selling cheap belts for $5-6, and I thought it might look cool to have the buckles showing anyways. I found a simple belt at Forever 21 and bought four of them, for a total of $25--a lot less than I would have spent for the plain straps!
To install the shelves:
-Cut the belt straps to the same length. I laid one of the boards on the floor against the wall, so I could see what the strap would look like before I cut it. Then I used the first strap as the template for the others.
-Fold the straps in half and screw in the screws that came with the drywall anchors, about a half inch from the top of the straps.
-Mark on your wall where the straps will mounted, starting with the top board. Make sure that the marks are level, and that there is room for the board to hang over on either side of the straps. Then, follow the instructions for using the drywall anchors.
-Once both sets of straps are installed, slide both the boards through, adjust them to be level, and admire your handiwork!

I know this tutorial isn't as simple as some of the ones I've posted in the past, where the instructions are so obvious they're practically unnecessary. So feel free to ask any questions you may have in the comments!
And if you're skeptical about shelves held up by cheap Forever 21 belt straps, I'm happy to say that (so far) these shelves feel really secure! They don't swing at all, and the boards don't tilt or move around in the straps. I'd definitely recommend trying it yourself!


What a clever idea, and it looks so easy to do:)
Thank you! It really was pretty easy...it took us about an hour total. The hardest part was deciding what belts to use! :)
They are just beautiful! Look so cute with all your dishes. Great job!
Thank you Debbie!
I pinned that photo from you and had the same idea of using leather belts! Way more cost effective and gives it a lot more personality. They look fantastic!! This project has been on my to do list, and this just makes me want to bump it to the top of the list!
Great minds think alike :) You should do it!
Hmmm.... yup, I definitely think I will be copying this idea! Looks lovely!
Yay! I hope you do--I want to see how they turn out if you decide to make them!
What an awesome project! And I love that you used Forever 21 belts - so smart!
Thanks :) Yes, being a cheapskate sometimes leads to great ideas, if I do say so myself. Thriftiness is the mother of invention!
these are so cute!
kw ladies in navy
Thank you Kelsey!
These are so cool! Love them. I thought they were stained at first. The gold paint is subtle but adds a great shimmer. I'm your newest follower on bloglovin.
Thank you Alexis! Glad you found me. You could definitely stain them too!
Wow! The shelves look amazing. Such a smart idea. :)
Very cute project! I love those 2 stacked cups on the right on the bottom shelf. Can you tell me who makes them and where I can get some? Just wondering...
Thank you Nancy! They are from Anthropologie, but I got them on sale a few months ago so I'm not sure if they're still selling them.
Thanks, for the info, Aileen!
How did you get the screw through the leather? You obviously have to make holes so im assuming you folded it in half and used a drill bit to drill through both layers of the leather belt at the top to mount to the wall?
Hi Ian--yep, that’s exactly right. We just drilled the holes in the leather before we mounted them.
These look great and are super reasonable compared to buying the Super Expensive store bought versions! How much weight do you think they would hold? The only reason I ask is because I thinking about installing two of these above a very nice tv vs a long mantle shelf. Thoughts? Thx!
Hi Shannon! It depends on the drywall anchors you get. I think each of our drywall anchors could hold 75 lbs so one shelf should technically be able to hold 150 lbs, although I probably wouldn't push it. Ours has mostly bowls and mugs on it, and it's super sturdy. I definitely wouldn't put a TV on the shelf, but I wouldn't be worried about hanging one above it!
Hi, I love this idea. Just wondering what sized belts that you bought I.e extra large. Plan to copy this this weekend.
Thanks
Hi Grace! I bought the largest sizes I could to make sure I had enough.
I am planning to do similar shelves in my son's room, but I keep worrying that over time the belts will stretch with the weight on the shelves and the shelves will end up tilting. How are yours holding up? Any problems with the belts stretching? I hope not! :) Thanks!
Hi Angela! So far, they are holding up great! No stretching at all (and they're just cheapo belts)
love this, pinned it!
Aww, thank you!